ASP.NET + Blazor (C#)
ASP.NET is a powerful framework for building modern web applications. It is one of the most widely adopted frameworks in the development community, ASP.NET offers a rich ecosystem for creating a wide range of applications from lightweight APIs to complex enterprise systems. With the advent of Blazor, a feature of ASP.NET, allowing to create interactive web applications with C# instead of JavaScript. This is made possible through WebAssembly this allows C# to run directly in the browser. Blazor's approach reduces the need to rely on JavaScript frameworks, streamlining the development process and making the application more maintainable and scalable.
In this tutorial, we will walk through the steps of building a simple yet powerful To-Do application using ASP.NET and Blazor. This To-Do app will showcase how Blazor's component-based architecture along with ASP.NET server-side capabilities can be leveraged to create interactive and dynamic web applications entirely in C#. You will learn how to use ASP.NET Core for backend functionality while Blazor provides the frontend experience, enabling a seamless interaction between the client and the server.
The goal of this tutorial is not only to build a To-Do app but also to gain experience in the core concepts of full-stack development using C# and Blazor.
1. Table of contents
- ASP.NET + Blazor (C#)
- 1. Table of contents
- 2. Installation & Setup
- 3. Configuration
- 4. Building the application
- 5. Best practices
- 6. Conclusion
- 7. Future updates
- 8. Github repository
Blazor is rapidly becoming a go-to framework for building modern web applications with C#. By using a unified language for both the client and server, Blazor offers a smoother, faster and more reliable development experience that aligns with modern trends in web development.
Let’s get started with building the application!
2. Installation & Setup
Before diving into building the app, you need to set up the required tools and initialize the project environment.
Step 1: Install required tools
To begin, ensure you have the following tools installed:
.NET SDK:
Download and install the latest .NET SDK (version 5.0 or higher is required). The SDK includes the tools necessary to build, test and run .NET applications.Node.js:
Node.js involves npm-based libraries or front-end dependencies. Download and install the recommended LTS version.Visual Studio Code:
Download and install Visual Studio Code a lightweight and powerful editor.
Additionally, install the following extension in Visual Studio Code for an enhanced development experience:- C# Devkit Extension: Provides IntelliSense and debugging support for .NET projects.
SQLite Browser (Optional):
Use SQLite Browser to visually inspect and manage your SQLite database during development.
Step 2: Create a new Blazor project using the command line
Blazor projects can be created using the .NET CLI or Visual Studio Code terminal. This tutorial uses the command line in Visual Studio Code for simplicity.
Open the terminal in Visual Studio Code.
Run the following command to create a new Blazor project:
bashdotnet new blazor -o todo-appThis command creates a new Blazor project in a folder named
todo-app.Navigate into the project folder:
bashcd todo-appRun the default app to ensure everything is working correctly:
bashdotnet watch runThis will open the browser and navigate to the application. You should see the default Blazor app running.
Tips for exploring the default template:
- Familiarize yourself with the existing sample pages (
Counter.razor,Weather.razoretc.). - Take note of the project structure and how navigation is set up.
Troubleshooting tips
- If you encounter issues running the app:
- Ensure the correct version of the .NET SDK is installed by running:bash
dotnet --version - Check for conflicting processes using the same ports and terminate them if necessary.
- Consider experimenting with the default components to understand their functionality before proceeding.
- Ensure the correct version of the .NET SDK is installed by running:
3. Configuration
Before adding custom logic or modifying the app, it's crucial to understand the project structure and make necessary configurations to align with the application requirements.
Overview of project structure
Blazor projects come with a predefined structure. Understanding the key files and folders is essential for efficient development:
_Imports.razor:
This file centralizes commonly used namespaces, saving you from adding@usingdirectives repeatedly in each component.Components/Pages:
Contains Razor components (pages) defined with the@pagedirective. Each file represents a routable component likeCounter.razor.Components/Layout:
Includes layout components such asNavMenu.razor(navigation) andMainLayout.razor(app layout).App.razor:
Acts as the root component of the Blazor application. It defines the application routing and layout.Program.cs:
Configures the application services, middleware and entry point.wwwroot/:
Stores static files like CSS, JavaScript and images.
Cleaning up the default template
The default template contains sample components (Counter.razor, Weather.razor etc.) that may not be relevant for your project.
Delete the sample files you don’t need:
Components/Pages/Counter.razorComponents/Pages/Weather.razorComponents/Pages/Home.razor
Update
NavMenu.razorto remove links to deleted pages. For example this can be removed:razor<div class="nav-item px-3"> <NavLink class="nav-link" href="counter"> <span class="bi bi-plus-square-fill-nav-menu" aria-hidden="true"></span> Counter </NavLink> </div>Ensure the app runs without errors after cleanup:
bashdotnet watch run
You now have a clean project to build the To-Do application.
4. Building the application
This section covers building the core functionality of the To-Do application. We will progressively enhance the app with features like database integration and custom styling.
Step 1: Create a new Razor component
To start, we’ll create a dedicated Razor component for the To-Do app.
Navigate to the Components/Pages folder.
Add a new file named
Todo.razor.Define a simple structure for the To-Do page by adding the following code:
razor@page "/todo" <h3>To-Do Application</h3> @* Content will be added here in future steps *@Add a link to this page in the navigation menu by updating
NavMenu.razor:razor<NavLink class="nav-link" href="todo"> <span class="bi bi-list-check"></span> To-Do app </NavLink>
Step 2: Set up basic To-Do page UI and logic
Now, implement the core To-Do list functionality using Blazor's binding and event handling capabilities.
Open
Todo.razorand replace its content with:razor@page "/todo" @rendermode InteractiveServer <h3>To-Do Application</h3> <input @bind="newTaskDescription" placeholder="Enter a new task" /> <button @onclick="AddTask">Add Task</button> <ul> @foreach (var task in tasks) { <li> <input type="checkbox" @bind="task.IsCompleted" /> @task.Description <button @onclick="() => RemoveTask(task)">Delete</button> </li> } </ul> @code { private string? newTaskDescription; private List<TaskItem> tasks = new(); private void AddTask() { if (!string.IsNullOrWhiteSpace(newTaskDescription)) { tasks.Add(new TaskItem { Description = newTaskDescription }); newTaskDescription = string.Empty; } } private void RemoveTask(TaskItem task) { tasks.Remove(task); } private class TaskItem { public string Description { get; set; } = string.Empty; public bool IsCompleted { get; set; } } }Save the file and run the app to verify that the To-Do functionality works as expected.
Step 3: Data in Memory (Optional)
Before integrating a database, you can persist data in memory for testing.
Modify the
Todo.razorcomponent to initialize tasks with a sample list:razorprivate List<TaskItem> tasks = new() { new TaskItem { Description = "Sample Task 1", IsCompleted = false }, new TaskItem { Description = "Sample Task 2", IsCompleted = true } };Reload the app to see the sample tasks preloaded.
This is a temporary solution, the tasks will reset when the app restarts.
The current state of the application should look like this now: 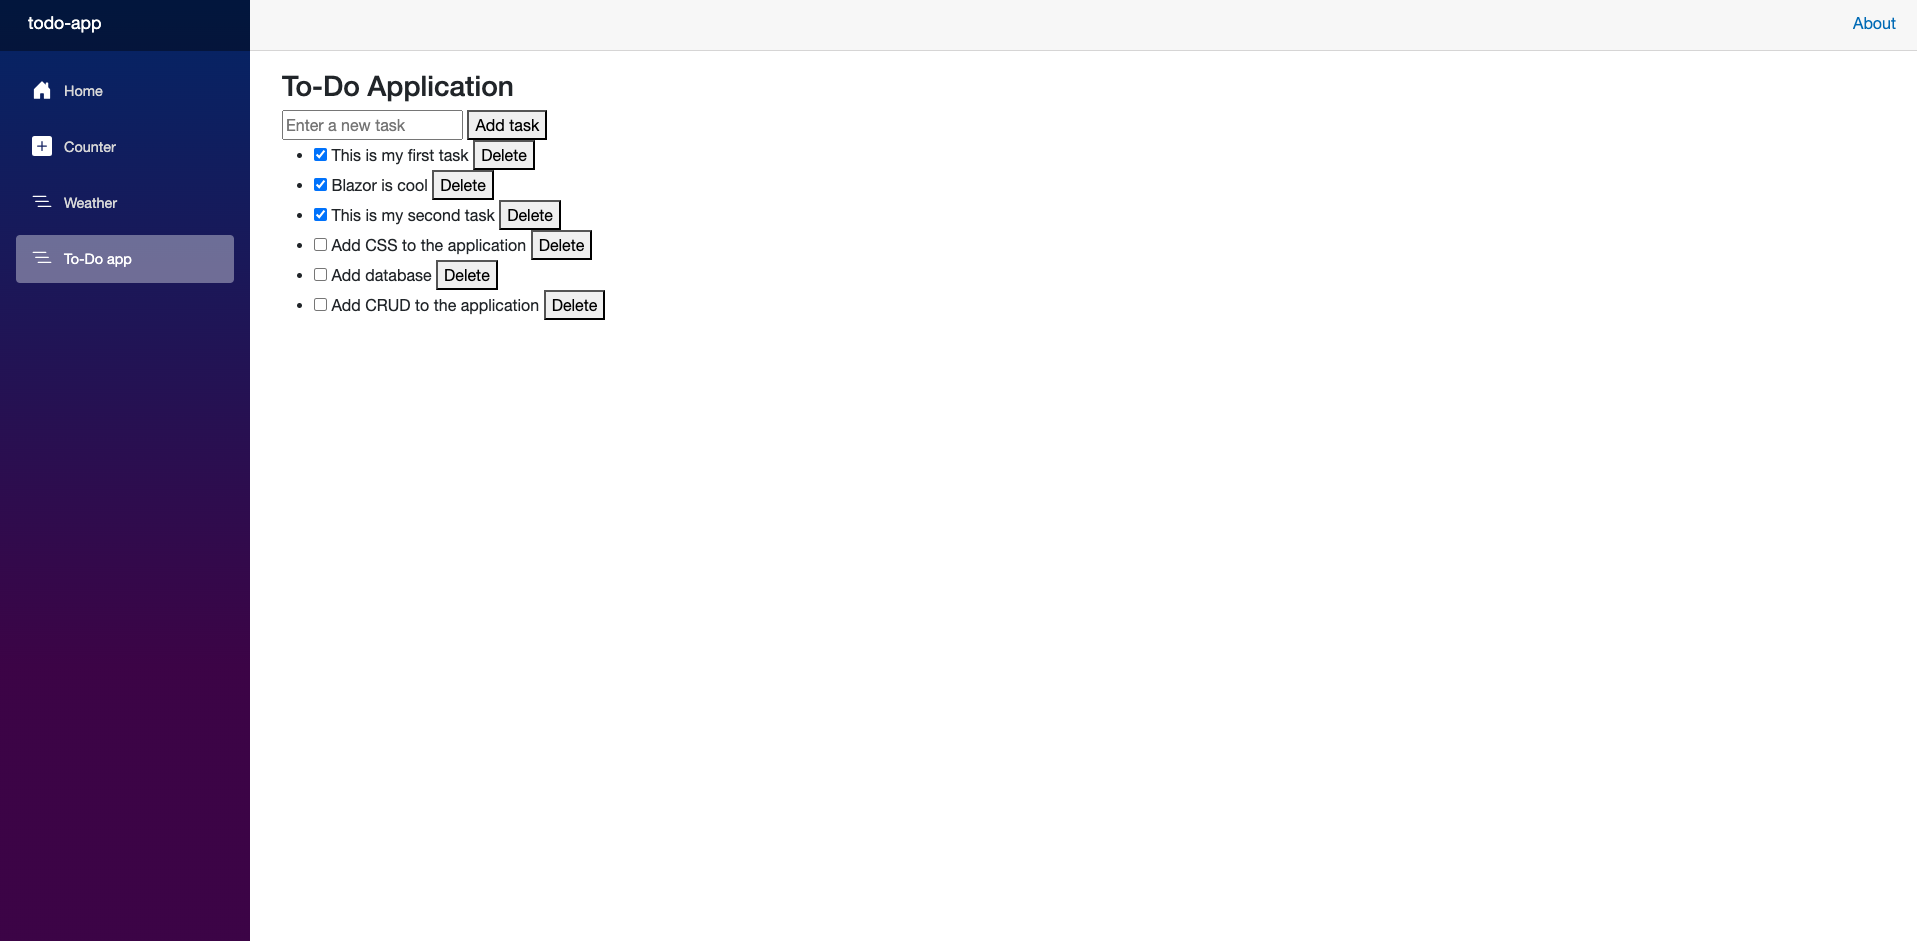
Step 4: Integrate a database
To make the To-Do application persistent, we’ll integrate a database using Entity Framework Core (EF Core). EF Core is an object relational mapper (ORM) that simplifies database interactions by allowing you to work with data in the form of objects, abstracting away much of the boilerplate SQL code. This enables us to store and retrieve tasks from a database rather than keeping them only in memory and ensuring data persists even when the application is restarted.
4.1: Install required packages
Entity Framework Core is used to interact with the database. To set it up, we need to install the necessary packages.
Install EF Core and SQLite packages:
bashdotnet add package Microsoft.EntityFrameworkCore.Sqlite dotnet add package Microsoft.EntityFrameworkCore.ToolsThese packages allow EF Core to work with SQLite and provide tooling support for managing migrations.
Install EF Core CLI tools (if not already installed):
bashdotnet tool install --global dotnet-efThis step is critical because the
dotnet efcommand is used to manage migrations (to reflect model changes in the database) and apply those changes. Without this, we cannot easily create or update the database schema.
4.2: Define the Task Model
The model represents the structure of our data in the database. By defining a model, we specify the schema of our TaskItem table.
Create a Models folder in the project. Organizing the code into folders improves maintainability and scalability.
Inside this folder, create a new file named
TaskItem.csand add the following code:csharpnamespace Models { public class TaskItem { public int Id { get; set; } // Primary Key public string Description { get; set; } = string.Empty; public bool IsCompleted { get; set; } } }Explanation:
- The
Idproperty is marked as the primary key which is essential for uniquely identifying records in the database. - The
Descriptionproperty stores the task details. - The
IsCompletedproperty keeps track of whether the task is finished.
- The
Update the
Todo.razorcomponent to use theTaskItemmodel:- Add the following directive at the top of
Todo.razor:razor@using Models - Remove the
TaskItemclass from the@codeblock to avoid redundancy and ensure the application uses the centralized model definition.
- Add the following directive at the top of
4.3: Create the database context
The database context acts as a bridge between the application and the database. It is responsible for querying and saving data.
Create a Data folder in your project to keep database related files organized.
Add a new file named
AppDbContext.csinside theDatafolder with the following code:csharpusing Microsoft.EntityFrameworkCore; using Models; public class AppDbContext : DbContext { public AppDbContext(DbContextOptions<AppDbContext> options) : base(options) { } public DbSet<TaskItem> Tasks { get; set; } = null!; }Explanation:
- The
AppDbContextclass inherits fromDbContext, this is a core class in EF Core used for database operations. - The
Tasksproperty represents a table in the database whereTaskItemobjects are stored.
- The
4.4: Configure the database context
To use the AppDbContext, we need to register it with the application dependency injection (DI) container and configure it to use SQLite as the database provider.
Open the
Program.csfile.Register
AppDbContextin the DI container:csharpusing Data; using Microsoft.EntityFrameworkCore; var builder = WebApplication.CreateBuilder(args); // Add services to the container. builder.Services.AddRazorComponents() .AddInteractiveServerComponents(); // Register AppDbContext builder.Services.AddDbContext<AppDbContext>(options => options.UseSqlite("Data Source=tasks.db")); var app = builder.Build(); // Configure the HTTP request pipeline. app.MapRazorComponents<App>("/"); app.Run();Explanation:
AddDbContext<AppDbContext>registers the database context so it can be injected wherever needed.UseSqlite("Data Source=tasks.db")specifies SQLite as the database provider and defines the database file name astasks.db.
4.5: Initialize the database
Now that the database is configured, we need to create the initial schema using migrations.
Open the terminal in your project’s root directory.
Run the following commands:
bashdotnet ef migrations add InitialCreate dotnet ef database updateExplanation:
dotnet ef migrations add InitialCreate: Generates a migration file based on the current model which defines the initial database schema.dotnet ef database update: Applies the migration to the database, creating thetasks.dbfile.
Verify that the
tasks.dbfile is created in your project directory. This file is the actual SQLite database where tasks will be stored.
Step 5: Connect the database to the application
Now that the database is set up, we’ll update the Todo.razor component to fetch tasks from the database and persist changes. This ensures that task data is stored and retrieved from the database and enabling full CRUD functionality.
5.1: Update Todo.razor
Replace the content of Todo.razor with the following:
@page "/todo"
@rendermode InteractiveServer
@using Models;
@using Microsoft.EntityFrameworkCore;
@inject AppDbContext DbContext

<h3>To-Do Application</h3>

<div class="task-input">
    <input @bind="newTaskDescription" placeholder="Enter a new task" />
    <button @onclick="AddTask">Add Task</button>
</div>

<ul>
    @foreach (var task in tasks)
    {
        <li>
            <input type="checkbox" @bind="task.IsCompleted" @bind:after="() => UpdateTask(task)" />
            <span>@task.Description</span>
            <button @onclick="() => RemoveTask(task)">Delete</button>
        </li>
    }
</ul>

@code {
    private string? newTaskDescription;
    private List<TaskItem> tasks = new();

    protected override async Task OnInitializedAsync()
    {
        tasks = await DbContext.Tasks.ToListAsync();
    }

    private async Task AddTask()
    {
        if (!string.IsNullOrWhiteSpace(newTaskDescription))
        {
            var newTask = new TaskItem { Description = newTaskDescription };
            DbContext.Tasks.Add(newTask);
            await DbContext.SaveChangesAsync();

            tasks.Add(newTask);
            newTaskDescription = string.Empty;
            StateHasChanged();
        }
    }

    private async Task RemoveTask(TaskItem task)
    {
        DbContext.Tasks.Remove(task);
        await DbContext.SaveChangesAsync();

        tasks.Remove(task);
        StateHasChanged();
    }

    private async Task UpdateTask(TaskItem task)
    {
        DbContext.Tasks.Update(task);
        await DbContext.SaveChangesAsync();
        StateHasChanged();
    }
}Explanation:
- Tasks are loaded from the database during component initialization.
- Adding, updating and removing tasks immediately reflects in the database.
- The
StateHasChangedmethod ensures that the UI refreshes to display the latest data.
5.2: Test the application
- Run the application:bash
dotnet watch run - Navigate to
/todo. - Add, update and remove tasks to ensure that data is persisted in the SQLite database.
By completing this step, the To-Do application now fully integrates with a persistent database providing a robust foundation for additional features or enhancements.
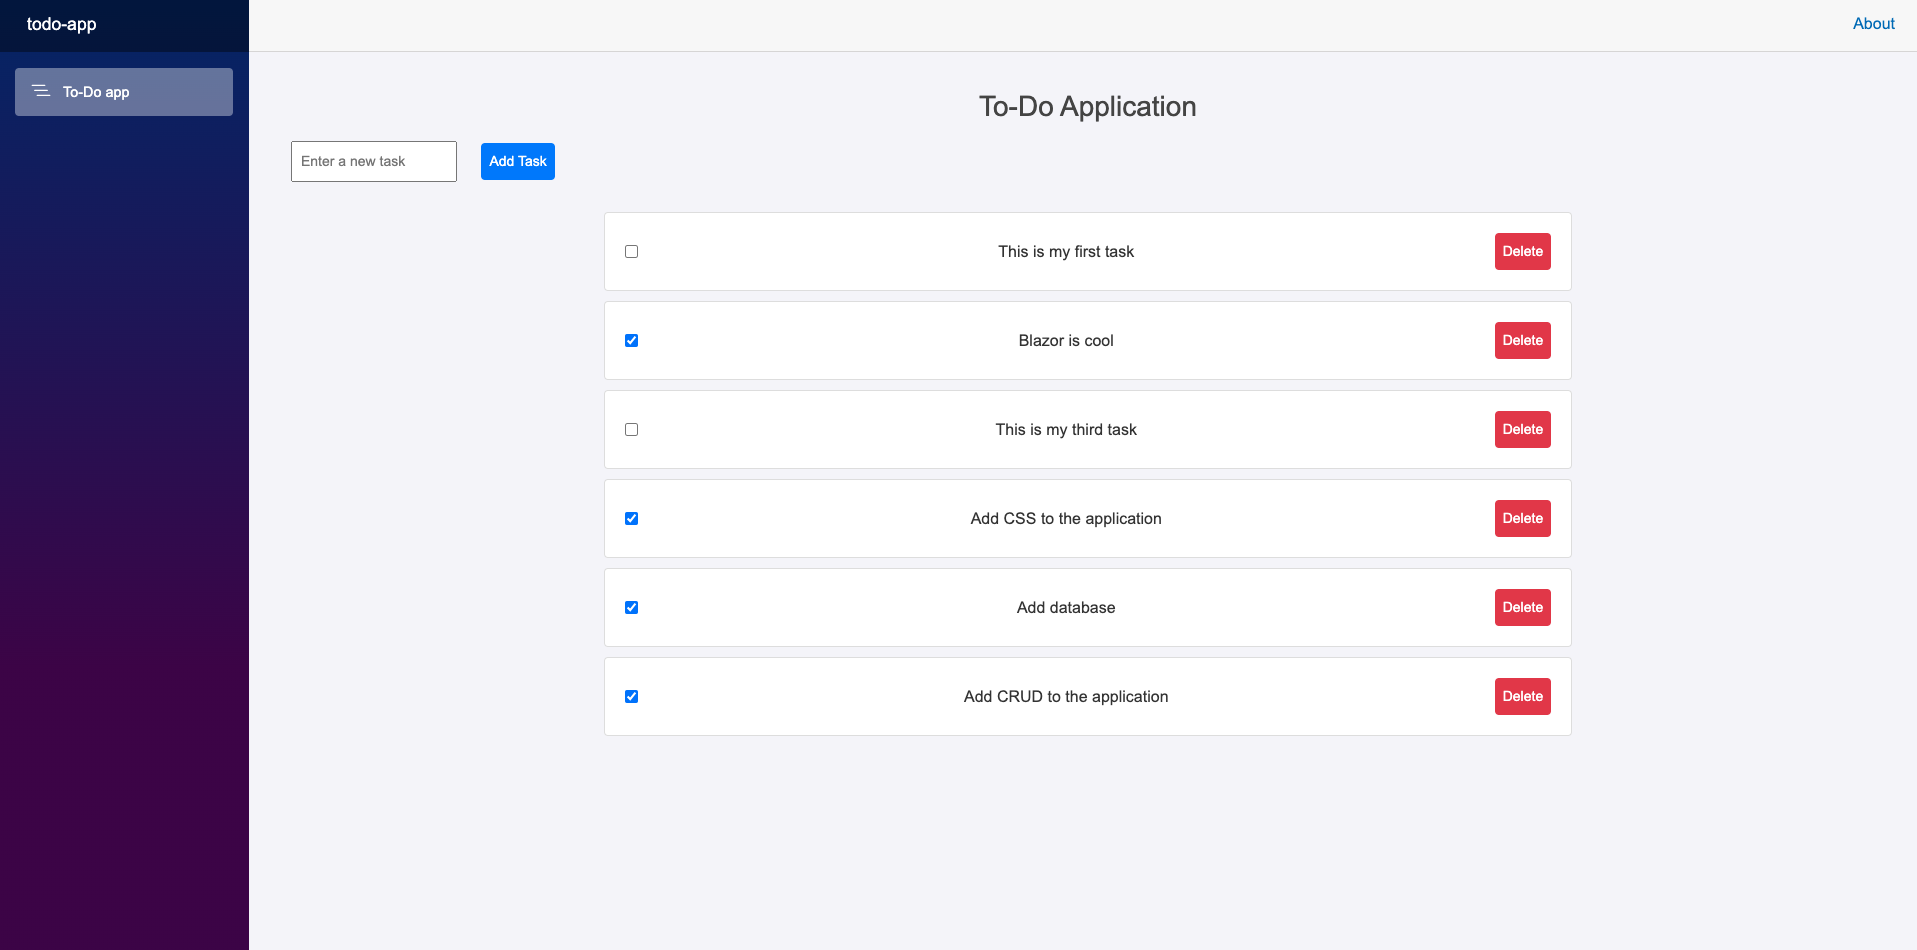
Step 6: Custom styling
Enhancing the appearance of the application with custom styling improves user experience and adds a professional touch to the application. This section walks you through adding styles to make your app more visually appealing.
6.1: Add a CSS file
Open your project and navigate to the
wwwrootfolder.Create a new file named
styles.css.Add the following styles to the file:
css/* General Styles */ body { font-family: Arial, sans-serif; margin: 0; padding: 0; background-color: #f4f4f9; color: #333; } h3 { text-align: center; margin-top: 20px; color: #444; } /* Input and Button Styles */ .task-input { display: flex; justify-content: center; margin: 20px; } input[type="text"] { width: 60%; padding: 8px; font-size: 14px; border: 1px solid #ccc; border-radius: 4px; } button { margin-left: 10px; padding: 8px 16px; font-size: 14px; color: white; background-color: #007bff; border: none; border-radius: 4px; cursor: pointer; } button:hover { background-color: #0056b3; } /* Task List Styles */ ul { list-style-type: none; padding: 0; margin: 20px auto; width: 60%; } li { background-color: #fff; margin: 10px 0; padding: 10px; border: 1px solid #ddd; border-radius: 4px; display: flex; justify-content: space-between; align-items: center; } li input[type="checkbox"] { margin-right: 10px; } li button { background-color: #dc3545; } li button:hover { background-color: #c82333; }
6.2: Link the CSS file
Open the
App.razorfile.Add the following
<link>tag to include thestyles.cssfile:html<link rel="stylesheet" href="styles.css" />
6.3: Update the Todo.razor component
Ensure your HTML in Todo.razor aligns with the class names in styles.css. Here’s an updated version of the component with added class attributes for better styling:
@page "/todo"
@rendermode InteractiveServer
@using Models;
@using Microsoft.EntityFrameworkCore;
@inject AppDbContext DbContext

<h3>To-Do Application</h3>

<div class="task-input">
    <input @bind="newTaskDescription" placeholder="Enter a new task" />
    <button @onclick="AddTask">Add Task</button>
</div>

<ul>
    @foreach (var task in tasks)
    {
        <li>
            <input type="checkbox" @bind="task.IsCompleted" @bind:after="() => UpdateTask(task)" />
            <span>@task.Description</span>
            <button @onclick="() => RemoveTask(task)">Delete</button>
        </li>
    }
</ul>

@code {
    private string? newTaskDescription;
    private List<TaskItem> tasks = new();

    protected override async Task OnInitializedAsync()
    {
        tasks = await DbContext.Tasks.ToListAsync();
    }

    private async Task AddTask()
    {
        if (!string.IsNullOrWhiteSpace(newTaskDescription))
        {
            var newTask = new TaskItem { Description = newTaskDescription };
            DbContext.Tasks.Add(newTask);
            await DbContext.SaveChangesAsync();

            tasks.Add(newTask);
            newTaskDescription = string.Empty;
            StateHasChanged();
        }
    }

    private async Task RemoveTask(TaskItem task)
    {
        DbContext.Tasks.Remove(task);
        await DbContext.SaveChangesAsync();

        tasks.Remove(task);
        StateHasChanged();
    }

    private async Task UpdateTask(TaskItem task)
    {
        DbContext.Tasks.Update(task);
        await DbContext.SaveChangesAsync();
        StateHasChanged();
    }
}Here we are! We have now created a basic functional To-Do application with custom styling and database integration. The app should look like this now:
5. Best practices
5.1: Reusable components
Break down your UI into smaller, reusable components. For example, create a Task.razor for individual tasks:
@using Models;

<div class="task-item">
    <input type="checkbox" @bind="Task.IsCompleted" @bind:after="OnTaskUpdated" />
    <span>@Task.Description</span>
    <button @onclick="RemoveTask">Delete</button>
</div>

@code {
    [Parameter]
    public TaskItem Task { get; set; } = null!;

    [Parameter]
    public EventCallback<TaskItem> OnTaskUpdate { get; set; }

    [Parameter]
    public EventCallback<TaskItem> OnTaskRemove { get; set; }

    private async Task OnTaskUpdated()
    {
        await OnTaskUpdate.InvokeAsync(Task);
    }

    private async Task RemoveTask()
    {
        await OnTaskRemove.InvokeAsync(Task);
    }
}Use this component in Todo.razor:
<ul>
    @foreach (var task in tasks)
    {
        <TaskComponent Task="task" OnTaskUpdate="UpdateTask" OnTaskRemove="RemoveTask" />
    }
</ul>5.2: State Management
As applications grow in complexity, managing state effectively becomes critical to ensure maintainability and performance. Centralizing application state allows for better synchronization across components and reduces the issue of inconsistent or redundant data.
Why it’s important:
- Centralized state management ensures all components are using the same data source, minimizing bugs related to mismatched state.
- Makes debugging and testing easier by providing a single source of truth.
Recommendations:
- Use extra libraries for management in Blazor.
- Keep the global state minimal and focused on shared data, while allowing local component state for isolated functionality.
- Leverage dependency injection to manage state services effectively.
Example:
Define a service class to manage tasks, then inject it into components. This ensures the state is shared and consistent across different parts of the app.
5.3: Accessibility
Building an accessible application ensures that users with disabilities can navigate and interact with the app effectively. It also broadens the audience for the application and aligns with web standards.
Key areas to focus on:
- ARIA attributes: Use
aria-label,aria-labelledby, oraria-describedbyto provide additional context for screen readers. - Keyboard navigation: Ensure all interactive elements can be accessed and activated using the keyboard alone.
- Visual indicators: Provide clear focus outlines for elements to improve navigation for users relying on keyboards.
- Screen reader testing: Regularly test the app with screen readers.
Example:
For the "Add Task" button:
<button @onclick="AddTask" aria-label="Add a new task to the list">
  Add Task
</button>5.4: Scalability
Scalability is essential when transitioning from a small application to a larger, production system. Proper architecture and design patterns play a significant role in ensuring the app remains performant and maintainable.
Strategies for scalability:
Modular architecture:
- Divide the app into smaller, self contained modules that handle specific functionalities.
- For example, separate modules for user management, task management and analytics.
Service and data layers:
- Abstract business logic into service classes and keep data access in a dedicated repository layer.
- This separation of concerns makes the app easier to test and adapt as requirements grow.
Lazy loading and caching:
- Load resources and components on demand to reduce initial load times.
- Implement caching to minimize repetitive data fetches.
Example:
Instead of directly interacting with DbContext in components, create a TaskService to handle data operations.
public class TaskService
{
    private readonly AppDbContext _context;

    public TaskService(AppDbContext context)
    {
        _context = context;
    }

    public async Task<List<TaskItem>> GetTasksAsync()
    {
        return await _context.Tasks.ToListAsync();
    }
}By incorporating these practices, the application will be better equipped to handle growing requirements while remaining maintainable and efficient.
6. Conclusion
Why are developers choosing ASP.NET and Blazor?
ASP.NET has long been a go-to framework for building web applications, and Blazor is rapidly becoming one of its most exciting features. It allows developers to write modern web applications using C# instead of JavaScript, making it an attractive choice for those who are already familiar with the C# language and the .NET ecosystem. There are several reasons why ASP.NET and Blazor are gaining traction among web developers:
1. Single language development
One of the key advantages of using ASP.NET and Blazor is the ability to write both the client-side and server-side code in C#. Traditionally, web development required developers to use JavaScript for the client-side and another language (like C# or PHP) for the server-side. This often led to switching between languages which could slow down development. By using C# across the entire stack developers can maintain consistency and focus on mastering a single language.
2. WebAssembly support
Blazor leverages WebAssembly (Wasm), this is a low-level bytecode format that runs directly in the browser to run C# code. This means that you can run C# code on the client-side just like JavaScript but with the added benefit of WebAssembly's near-native performance. The Blazor WebAssembly model eliminates the need for server circuition to run client-side logic which results in faster and more responsive applications that run directly in the browser.
3. Rich ecosystem
ASP.NET and Blazor are backed by Microsoft which provides a wealth of tools, libraries and frameworks for developers. Visual Studio and Visual Studio Code, one of the most powerful integrated development environments (IDEs) available offers robust support for building and debugging both ASP.NET and Blazor applications.
4. Future-proof
Blazor is built with modern web development in mind and is rapidly evolving as a platform. By choosing Blazor, developers are investing in a technology that aligns with the future of web development. The .NET team at Microsoft is committed to continuously improving Blazor, adding new features and making it even more powerful for building web applications in C#. As the web continues to evolve, Blazor is poised to be an integral part of the ecosystem.
5. Seamless component Model
Blazor is built around a component-based architecture which is a popular design pattern in modern web frameworks. Each component in Blazor is a self-contained unit of functionality, including its UI, logic and state. Components can be reused across the application, making it easy to break down complex user interfaces into smaller and manageable parts. This modular approach leads to cleaner, more maintainable code and allows for easy testing and debugging.
Moreover, Blazor components can interact with each other, share state and can even be composed into larger applications with minimal effort. This makes Blazor a powerful framework for creating scalable web applications that can grow with the needs of your business.
7. Future updates
What can you expect in 2025 and beyond?
As we look to the future, the world of ASP.NET and Blazor development is poised for exciting advancements. The roadmap for 2025 focuses on expanding capabilities, enhancing developer experiences and addressing emerging trends in web development. Here’s a sneakpeak of what’s coming next:
7.1: Enhanced WebAssembly integration
Blazor WebAssembly is already transforming client-side development with its ability to run C# code directly in the browser. In 2025, expect improvements in performance, debugging tools and interop capabilities between Blazor and JavaScript. Microsoft is also exploring advanced WebAssembly features like multi-threading and reduced download sizes to further optimize user experiences.
7.2: Expanded framework support
Blazor’s popularity continues to grow across diverse development ecosystems. Future updates are expected to improve support for integrating Blazor with popular frontend frameworks like Angular and Vue.js. This will enable hybrid applications that combine the strengths of Blazor and existing JavaScript ecosystems, making it easier to adopt Blazor incrementally in complex projects.
7.3: Developer productivity tools
2025 will bring more powerful tools for Blazor developers, including:
- Live debugging and diagnostics: Enhanced capabilities to debug Blazor applications in real-time, both on the client and server.
- AI-assisted code generation: Tools like Copilot will integrate more deeply into Blazor development, offering context-aware suggestions to speed up component creation and state management.
7.4: Ecosystem growth
The community around ASP.NET and Blazor continues to expand, contributing new libraries, patterns and best practices. Microsoft has plans to provide better templates and starter projects for common use cases such as e-commerce, dashboards and progressive web apps (PWAs). These resources will empower developers to hit the ground running with Blazor.
7.5: Accessibility and inclusivity
Accessibility is becoming an essential focus for all web technologies. Blazor updates will emphasize better tools and standards to create inclusive applications such as improved ARIA support, automated testing for accessibility compliance and streamlined workflows for creating accessible components.
7.6: Community contributions
The Blazor and ASP.NET ecosystems thrive on contributions from developers around the world. Microsoft will continue to foster this vibrant community by providing new opportunities for collaboration, including hackathons, open-source projects and feature-request feedback loops. Developers are encouraged to contribute ideas and innovations through GitHub and other community channels.