
Table of contents
- Table of contents
- What is Nuxt?
- What are the pros?
- What are the cons?
- Make your own quote generator
- Best practices
- Future updates and versions
- Real life examples
What is Nuxt?
Nuxt is a free and open-source framework that provides an intuitive way to create full-stack web applications and websites using Vue.js. You can start writing .vue files right away, with server-side rendering by default. Nuxt also has no vendor lock-ins, allowing applications to be deployed anywhere.
Nuxt uses conventions, automation and a directory structure to automate repetitive tasks:
- With file-based routing, you define routes based on the structure of the directory. This makes your application easier to organize and eliminates the need to manually configure routes.
- Nuxt automatically breaks code into smaller chunks, which can reduce application load time.
- If you write Vue components in their respective directories, you can use them without having to import them, due to tree-shaking.
What else is good to know about Nuxt? The framework uses the server engine Nitro. This is useful because in production this engine builds the output in 1 directory and the application minimized. A Nuxt application can also be deployed to a Node server, rendered to be hosted in static environments or deployed to serverless and edge providers. Finally, you can extend Nuxt with custom features and integrations with third-party services.
What are the pros?
- Nuxt provides an out-of-the-box solution for server-side rendering (SSR) and static site generation (SSG).
- SSR and SSG improve SEO by ensuring that search engine crawlers can easily index content, especially important for dynamic content.
- File-based routing eliminates the need for manual route configuration. Each .vue file in the pages directory automatically becomes a route.
- Nuxt has an active community and detailed documentation, making it easier to learn and troubleshoot.
- Offers robust support for TypeScript and the Vue 3 Composition API, making it future-ready and developer-friendly.
What are the cons?
- While Nuxt simplifies SSR, its additional abstractions and configuration options can be overwhelming for developers new to SSR or Vue.
- For smaller or purely client-side projects, the SSR/SSG capabilities can introduce unnecessary complexity and overhead.
- The framework's conventions can sometimes feel restrictive, especially for developers looking for a fully custom setup.
- For large applications, static site generation can result in long build times, especially if there are numerous pages or complex data-fetching requirements.
- Errors in SSR can be harder to debug compared to client-side rendering, as they occur on the server side and often require more specialized knowledge.
Make your own quote generator
Want to learn more about Nuxt while making a working application?
Follow these steps to make your own random quote generator, using the Quote API from ZenQuotes (https://zenquotes.io/api/random). While making this application, you'll learn basic needs from Nuxt, like setup and configuration, but also advanced functionalities, like fetching data and being able to share it on social media.
1. Installation
Start by installing a new Nuxt project. Do this by navigating to your chosen folder on your computer and executing this code:
npx nuxi init quote-generatorAnswer the questions asked in the terminal.
cd quote-generatorStart up the development server:
npm run dev2. Add Tailwind CSS (optional)
Navigate to the file 'nuxt.config.ts'. Install Tailwind in your project via your terminal.
npm install -D @nuxtjs/tailwindcssEnable it by adding it in the the config file from Nuxt. The file will then look like this:
export default defineNuxtConfig({
  compatibilityDate: "2024-04-03",
  devtools: { enabled: true },
  modules: ["@nuxtjs/tailwindcss"],
});3. Add environment variables (.env file)
As we will be using an API, the best and most secure way to add this in your project, is by using a .env file. If you are using and API that requires a key, the environment file it the best place to store this key. This file will not appear on Github or another platform that shares your code.
For collaborators you can add and .env.example, only containing the variable names. That way, people will know what they need to fill in and the variable names will not need to be changed in the application.
Add an .env file to the root of your project and add this code.
API_URL=https://zenquotes.io/api/randomAccess to this variable will be added in the nuxt.config.ts file. Add this code so your file looks like this:
export default defineNuxtConfig({
  compatibilityDate: "2024-04-03",
  devtools: { enabled: true },
  modules: ["@nuxtjs/tailwindcss"],
  runtimeConfig: {
    public: {
      apiUrl: process.env.API_URL || "https://zenquotes.io/api/random",
    },
  },
});4. Add robots.txt (optional)
Don't want search engines to crawl your project? You can specify this in the robots.txt file. You find this in the public folder of you application. Add next configuration lines.
  User-agent: *
Disallow: /5. Add an api file to fetch the random quote
To avoid CORS issues while fetching the quote, we will make an api folder in the server folder which will include the file quotes.js. This file will run the following code.
export default defineEventHandler(async (event) => {
    const response = await fetch('https://zenquotes.io/api/random');
    const data = await response.json();
    return data;
});6. Add the quote generator component
First add a folder for the components in the root of the project. This way, Nuxt will automatically search this folder for components you use in the app.vue file.
Next, add a 'QuoteGenerator.vue' file. Be aware of the capitals! Always start component files with a capital, and use CamelCase.
Add a template to the file that will show the quote and a button to generate another quote.
<template>
  <div class="quote-generator">
    <div v-if="loading" class="loading">Loading...</div>
    <div v-else>
      <p class="quote-text">"{{ quote.text }}"</p>
      <p class="quote-author">- {{ quote.author }}</p>
      <button @click="fetchQuote" class="new-quote-btn">New Quote</button>
    </div>
  </div>
</template>Then add the setup code to manage and initialize reactive data in script setup tags.
<script setup>
import { ref, onMounted } from "vue";
const quote = ref({ text: "", author: "" });
const loading = ref(false);
</script>- ref: This function is used to create reactive variables in Vue. Reactive variables automatically update in the DOM when their values change, which is useful for managing and displaying dynamic data in components.
- onMounted: This is a Vue lifecycle hook that runs a function when the component is first mounted (inserted into the DOM). It’s commonly used to initialize data by making API calls, setting up event listeners, or performing any setup work that should happen once the component is visible.
- const quote = ref({ text: '', author: '' }): Here, quote is a reactive reference to an object containing two properties: text and author. Initially, both properties are empty strings. This will be updated when data (such as from an API) is fetched.
- const loading = ref(false): Loading is typically used as a loading indicator, which helps manage the loading state of the application.
Then, in the same script tags, add the function to fetch the random quote.
async function fetchQuote() {
  loading.value = true;
  try {
    const response = await fetch("/api/quotes");
    const data = await response.json();
    const fetchedQuote = data[0];

    quote.value = {
      text: fetchedQuote.q,
      author: fetchedQuote.a,
    };

  } catch (error) {
    quote.value = {
      text: "Could not load a quote.",
      author: "Error",
    };
  } finally {
    loading.value = false;
  }
}

onMounted(fetchQuote);Last but not least, add some CSS to style this component at the bottom of the file.
<style>

  .quote-generator {
    text-align: center;
    padding: 20px;
  }

  .new-quote-btn {
    margin-top: 10px;
    padding: 10px 20px;
    cursor: pointer;
  }

</style>7. Adjust the app.vue file
Next, adjust the app file so it shows this QuoteGenerator component. Here, you can add some extra stuff, like a header. The styling is also added at the bottom of the file.
<template>
  <div>
    <h1>Quote Generator</h1>
    <QuoteGenerator />
  </div>
</template>

<style>
h1 {
  text-align: center;
}
</style>** And there you go, you have just made your first Nuxt project. Want to add some advanced features? Follow the next steps.**
8. Add a copy button
Underneath the 'new quote' button, add another button to copy the quote.
<button @click="copyToClipboard">Copy Quote</button>Next, add the function that will add the quote to your clipboard underneath the fetchQuote function in QuoteGenerator component. When clicking the button, the text and author of the quote will be added to your computers clipboard. Then, a window alert box will appear to inform you that the quote has been copied.
function copyToClipboard() {
  navigator.clipboard.writeText(`"${quote.value.text}" - ${quote.value.author}`);
  window.alert('quote copied');
}9. Add a share button
To be able to share the quote displayed, you can add another button in the template. Choose where you want to display this button, and add this code.
<button @click="shareOnFacebook">Share on Facebook</button>In the script tags, add the corresponding function.
function shareOnFacebook() {
const fbShareUrl = `https://www.facebook.com/sharer/sharer.php?u=${encodeURIComponent(
window.location.href
)}"e=${encodeURIComponent(`"${quote.value.text}" - ${quote.value.author}`)}`;
window.open(fbShareUrl, '_blank');
}For Twitter this would be:
<button @click="shareOnTwitter">Share on Twitter</button>In the script tags, add the corresponding function.
function shareOnTwitter() {
  const tweet = `"${quote.value.text}" - ${quote.value.author}`;
  const url = `https://twitter.com/intent/tweet?text=${encodeURIComponent(tweet)}`;
  window.open(url, '_blank');
}Best practices
What is it best you remember during the making of a Nuxt project?
That you work in components, adding them to a 'components'-folder and using CamelCase for the name.
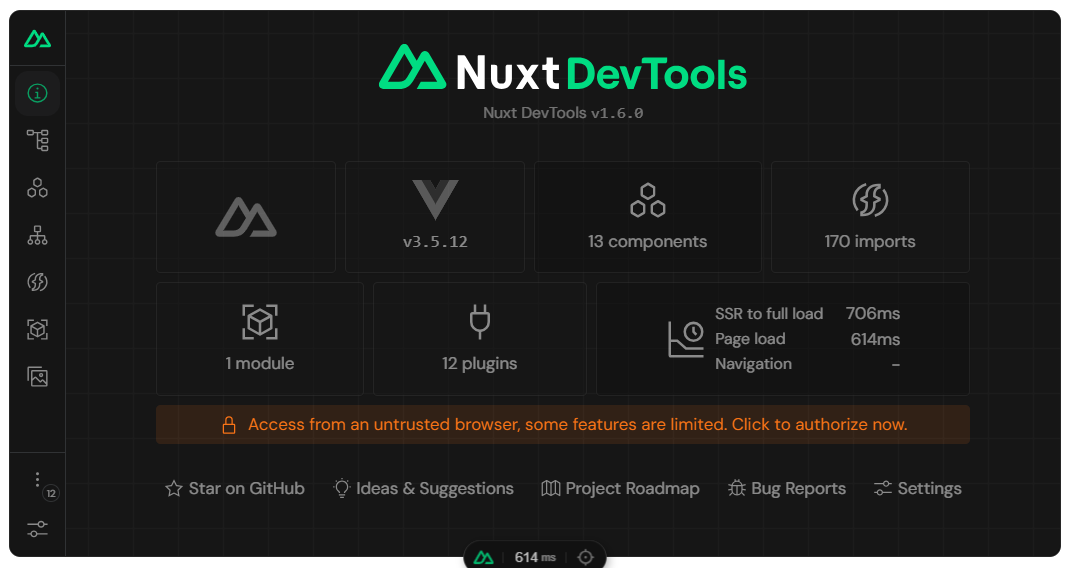
You can use the developer tools at the bottom of the page. This dashboard shows which version you're using, you're components, the routes you have made and more. Don't want to use them? You can turn them off in the nuxt.config.ts file.
Use folders to make the routing in your project.
Add an .env file for more security. Below you can see the ENV file example of the tutorial.

Future updates and versions
At the moment, Nuxt uses version 3. When a new version is released, you can update your application by running the upgrade command in the terminal.
npx nuxi upgradeNuxt 4 is planned to be released (release date TBA). When you have upgraded to this latest version, be sure to update the compatibilityVersion in nuxt.config.ts to 4. When you set your compatibilityVersion to 4, defaults throughout your Nuxt configuration will change to opt in to Nuxt v4 behavior. You can gradually re-enable Nuxt v3 behavior when testing, following the commented out lines above.
export default defineNuxtConfig({
  future: {
    compatibilityVersion: 4,
  },
  // To re-enable _all_ Nuxt v3 behavior, set the following options:
  // srcDir: '.',
  // dir: {
  //   app: 'app'
  // },
  // experimental: {
  //   scanPageMeta: 'after-resolve',
  //   sharedPrerenderData: false,
  //   compileTemplate: true,
  //   resetAsyncDataToUndefined: true,
  //   templateUtils: true,
  //   relativeWatchPaths: true,
  //   normalizeComponentNames: false
  //   defaults: {
  //     useAsyncData: {
  //       deep: true
  //     }
  //   }
  // },
  // unhead: {
  //   renderSSRHeadOptions: {
  //     omitLineBreaks: false
  //   }
  // }
})Real life examples
Many sites use the Nuxt framework. Some examples are: