
VitePress - Styleguide & Content
Vitepress, a static site generator, is a tool that allows you to very easily create a website. It is a tool that is built on top of Vue, which is a popular JavaScript framework. Vitepress comes with a lot of features out of the box, such as a built-in markdown editor, a live preview, and a lot of other features that make it easy to create a website.
In this tutorial, we will take a look at how to create a styleguide and content for your Vitepress website. But before we start, let's take a look at what Vitepress is and how it works, where it comes from, and what it can do for you.
Table of contents
- VitePress - Styleguide & Content
What is Vitepress?
Vitepress is a static site generator that is built on top of Vue. It is a tool that allows you to very easily create a website. It is a tool that is built on top of Vue, which is a popular JavaScript framework. Vitepress comes with a lot of features out of the box, such as a built-in markdown editor, a live preview, and a lot of other features that make it easy to create a website.
Ship Fast Sites
Vitepress is a static site generator. This means that when you build your website with Vitepress, it will generate static HTML files that you can host on any web server. This is different from a dynamic website, where the content is generated on the server or send to the client as a response to a request made by the client.
With a static site generator, the content is generated once and then served to the client as a static file. This makes static site generators very fast and efficient, as they do not have to generate the content every time a request is made.
Seach Engine Optimization (SEO)
Search engine optimization, why is it important? Also known as SEO, search engine optimization is the process of optimizing your website so that it can be found by search engines like Google, DuckDuckGo, etc. This is important because if your website is not optimized for search engines, it will be difficult for people to find your website when they are searching for the content that you have on your website.
As said before, Vitepress generates static HTML files during the build process, which means that all is ready to be indexed by search engines. This means that when Google or any other search engine crawls your website, it will be able to index all the content on your website. This is important for search engine optimization, as it allows your website to be found by people who are searching for the content that you have on your website.
Unlike other websites where the content is generated on the server the moment a request is made, which means that the search engine has to wait for the server to generate the content before it can index it. With Vitepress, the content is already generated and ready to be indexed by the search engine. This makes it easier for the search engine to find and index your website, which can help improve your website's ranking in the search results because of the fast loading times.
Focus on your content
Vitepress is a tool that allows you to focus on your content. Out of the box, Vitepress comes with a built-in markdown editor that allows you to write your content in markdown. Markdown is a markup language. It allows you to write your content in a simple and easy way, without having to worry about the formatting of the content.
As developers, we often have to write a lot of documentation, tutorials, and other content that we want to share with others. With Vitepress, you can focus on writing your content, without having to worry about the formatting of the content. This makes it easy to create a website that is focused on the content, without having to worry about the design of the website.
If you want to add a more personalized touch to your website, you can also use Vue components to create custom elements for your website. Vue is a popular JavaScript framework that allows you to create interactive and dynamic user interfaces. Using YAML front matter, you can create custom components, like a table of contents, a sidebar, or a footer, that can be reused across your website or at specific pages where you want to add them.
Markdown
In case you are not familiar with markdown, here is a quick overview of how it works. Markdown is a markup language that is easy to write and read. Markdown uses simple text formatting to create headings, lists, links, images, and other elements that you can use to create your content.
Unlike HTML, which uses tags to define the structure of the content, markdown uses simple text formatting such as # for headings, - for lists, []() for links, and ![]() for images.
In case you still need to use HTML, you can also use HTML in markdown. Sometimes you need to use HTML to create more complex elements that are not supported by markdown or want to add a spacing or break between elements. This is possible by using HTML in markdown, such as <br> for a line break.
Here is an example of how you can create some markdown content:
Heading
markdown# This is a headingList
markdown- Item 1 - Item 2 - Item 3Link
markdown[This is a link](https://www.example.com)In this case the text is "This is a link" and the link is https://www.example.com.
Image
markdownIn this case the alt text is "This is an image" and the image is located in the assets folder with the name example-image.jpg.
HTML
markdown<br>
This is just a small example of what you can do with markdown.
Custimization
Vitepress is a tool that allows you to customize your website. Out of the box, Vitepress comes with a default theme that you can use to create your website. But if you feel like the default theme is not fully to your liking, you can apply custom styles, custom components, and other custom elements to your website.
Vue Components
In Vitepress, you can components written in Vue that are reusable elements that you can use to create custom elements for your website. Vue components are created using Vue, a JavaScript framework that allows you to create interactive and dynamic user interfaces.
In VitePress Vue components are perfect to integrate using data from the front matter (YAML) of your markdown files. You can set the Vue component to only show when a certain condition is met, like the content itself or a specific tag in the front matter. This way you can create a more personalized touch to your website, by adding custom elements that are only shown on specific pages or when a certain condition is met.
A few examples of Vue components that you can header, footer, sidebar, social media links, and more.
Here is an example of how you can create a Vue component:
<script setup>
import { useData, withBase } from 'vitepress'
const { page, frontmatter } = useData()
</script>

<template>
  <div v-if="frontmatter.thumbnailUrl" class="mb-8 min-[1280px]:max-w-[76%]">

    <img
      :src="withBase(frontmatter.thumbnailUrl)"
      :alt="frontmatter.title"
      class="w-full h-72 object-cover rounded-[12px]"
    />

  </div>
</template>In this example, we are creating a Vue component that shows an image if the front matter contains a thumbnailUrl. The image is displayed with the title of the page as the alt text. The banner will only appear when the front matter contains a thumbnailUrl.
You can see that we are using the useData and withBase functions from Vitepress to get the data from the front matter from the markdown file. And we are using the v-if directive to only show the image when the front matter contains a thumbnailUrl.
In Vue all dynamic data such as the src and alt attributes only work with the : in front of the attribute. This is because Vue needs to know that the value is dynamic and should be updated when the data changes.
In this example, Tailwind CSS is used to style the component.
Currently the Vue component is only made, but not yet used. To use the Vue component, you need to import it in the layout or page where you want to use it. You can add the Vue component to to index.ts file found ./.vitepress/theme/index.ts:
import DefaultTheme from 'vitepress/theme'
import { h } from 'vue'
import Banner from './components/Banner.vue'

export default {
  extends: DefaultTheme,
  Layout: () => {
    return h(DefaultTheme.Layout, null, {
      'doc-top': () => h(Banner),
    })
  },
  enhanceApp({ app, router, siteData }) {
    // ...
  }
} satisfies ThemeIn this example, we are importing the Vue component and adding it to the layout. The Vue component will be shown at the top of the page, before the content of the page, because we are using the doc-top slot. You can also use other slots to add the Vue component to other parts of the page, such as the footer or the sidebar. Per layout, there are different slots available to add Vue components. All slots can be found in the Vitepress documentation.
Styling
In Vitepress, you can also add custom CSS and styling frameworks to your website. From the default theme, there are a lot of classes available that you can use to style your website. But if you want to add custom styles or use a styling framework like Tailwind CSS, you can do that as well.
Custom CSS
To override the default styles of the default theme, it is possible to change to default root variables. This can be done by creating a vars.css file in the folder ./.vitepress/theme/styles/, and adding the file that can be copied from via this link from the Vitepress repository.
After you have added the vars.css file, you need to import it in the index.css file in the ./.vitepress/theme/index.css file. When added, you can start changing the default colors and other styles to your liking. This way you can create a website that is fully customized to your liking.
Tailwind CSS
If you want to use a styling framework like Tailwind CSS, you can add it to your project by installing it with npm or yarn. After you have installed Tailwind CSS, you can add it to your project by importing it in the index.css file in the ./.vitepress/theme/index.css file.
The advantage of using Tailwind CSS is that it comes with a lot of utility classes that you can use to style your website. This saves a lot of time because you don't have to write custom CSS for every element on your website.
Creating a vitepress website
Now that we know what Vitepress is and what it can do for us as developers, let's get started with creating a styleguide and adding content to our website. In the next part of this tutorial, we will take a look at how to set up a Vitepress project, add custom styles and components to our website, and create a styleguide for our website.
If you want to learn more about Vitepress, you can take a look at the official documentation. The documentation contains a lot of information about how to use Vitepress, how to create a website with Vitepress, and how to customize your website with custom styles and components.
Installation
To get started with Vitepress, you need to have Node.js installed on your computer. After you have installed Node.js, you can create a new Vitepress project by running the following command in your terminal:
npm initnpm add -D vitepressAfter you have installed Vitepress, you can create a new Vitepress project by running the following command in your terminal:
npx vitepress initWhen running this command, Vitepress will ask you a few questions about your project, such as the name of your project, the author of the project, and the description of the project. Answer the questions like this:
┌ Welcome to VitePress!
│
◇ Where should VitePress initialize the config?
│ ./
│
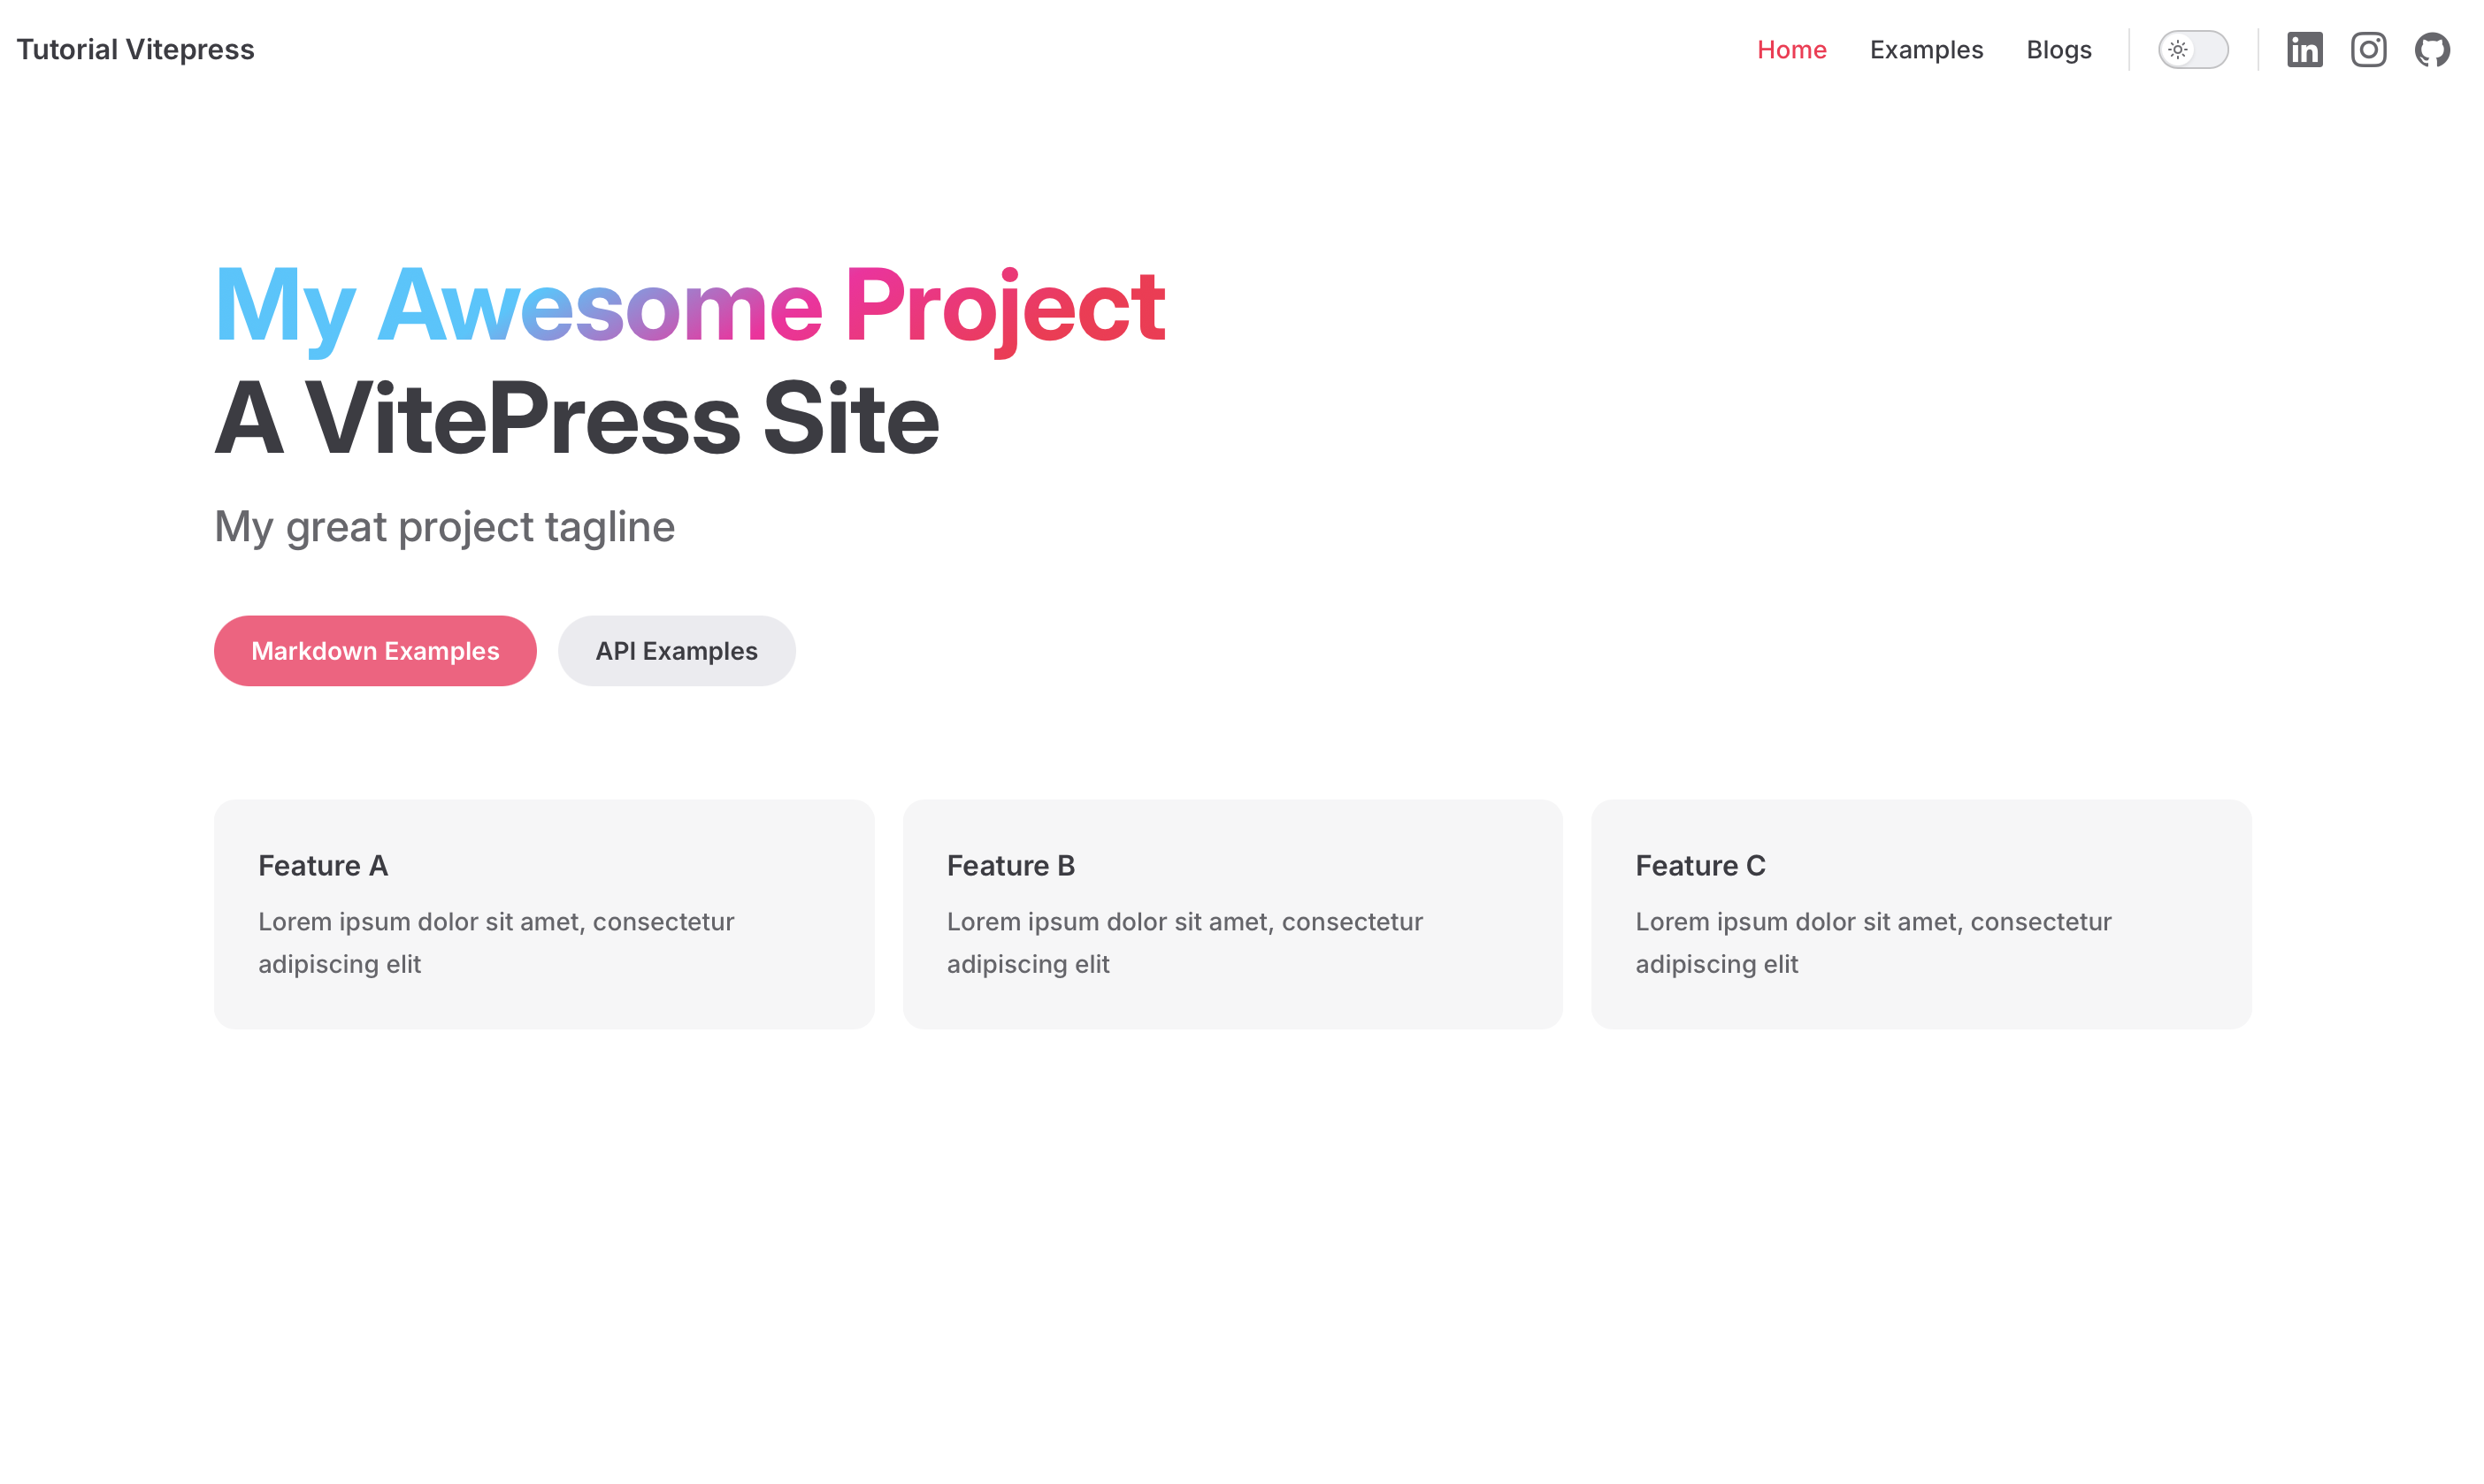
◇ Site title:
│ My Awesome Project
│
◇ Site description:
│ A VitePress Site
│
◇ Theme:
│ Default Theme + Customization
│
◇ Use TypeScript for config and theme files?
│ Yes
│
◇ Add VitePress npm scripts to package.json?
│ Yes
│
└ Done! Now run npm run docs:dev and start writing.If everything went well you currently have file structure like this:
.
├─ .vitepress
│  ├─ theme
│  │  ├─ index.ts
│  │  ├─ style.css
│  ├─ config.mts
├─ api-examples.md
├─ index.md
├─ markdown-examples.md
├─ package-lock.json
└─ package.jsonAfter you have created a new Vitepress project, you can start the development server by running the following command in your terminal:
npm run docs:devWhen you run this command, Vitepress will start a development server that you can use to preview your website. You can open your browser and go to http://localhost:5174/ to see your website. You can now start writing content for your website in the markdown files in the docs folder.
Exploring the config.mts
The config.mts file is the configuration file for your Vitepress project, located in the .vitepress folder. In this file, you can configure the base of your website. This includes the title of your website, the description of your website and set up things like the nav, sidebar, socials links, and more.
The base structure of the config.mts file looks like this:
import { defineConfig } from 'vitepress'

// https://vitepress.dev/reference/site-config
export default defineConfig({
  title: "My Awesome Project",
  description: "A VitePress Site",
  themeConfig: {
    // https://vitepress.dev/reference/default-theme-config
    nav: [
      { text: 'Home', link: '/' },
      { text: 'Examples', link: '/markdown-examples' }
    ],

    sidebar: [
      {
        text: 'Examples',
        items: [
          { text: 'Markdown Examples', link: '/markdown-examples' },
          { text: 'Runtime API Examples', link: '/api-examples' }
        ]
      }
    ],

    socialLinks: [
      { icon: 'github', link: 'https://github.com/vuejs/vitepress' }

    ]
  }
})We will start with changing our website title and description. You can do this by changing the title and description properties in the config.mts file.
I will change the title to "VitePress - Styleguide & Content" and the description to "This is an example tutorial. You can use this file as a template to create your own tutorials."
import { defineConfig } from 'vitepress'

// https://vitepress.dev/reference/site-config
export default defineConfig({
  title: "VitePress - Styleguide & Content",
  description: "This is an example tutorial. You can use this file as a template to create your own tutorials",

  // ... the rest of the config
})Finally, you can add social media links to your website by adding them to the socialLinks array in the config.mts file. You can add as many social media links as you want, by adding a new object to the socialLinks array with the icon and link properties.
I will add a example linkedin, instagram, and github link to the socialLinks array.
import { defineConfig } from 'vitepress'

// https://vitepress.dev/reference/site-config
export default defineConfig({
  // ... the rest of the config

  themeConfig: {
    // ... the rest of the theme config

    socialLinks: [
      { icon: 'linkedin', link: 'https://www.linkedin.com/in/example' },
      { icon: 'instagram', link: 'https://www.instagram.com/example' },
      { icon: 'github', link: 'https://www.github.com/example' }
    ]
  }
})So now the config.mts file looks like this:
import { defineConfig } from 'vitepress'

// https://vitepress.dev/reference/site-config
export default defineConfig({
  title: "Tutorial Vitepress",
  description: "This is an example tutorial. You can use this file as a template to create your own tutorials",
  themeConfig: {
    // https://vitepress.dev/reference/default-theme-config
    nav: [
      { text: 'Home', link: '/' },
      { text: 'Examples', link: '/markdown-examples' }
    ],

    sidebar: [
      {
        text: 'Examples',
        items: [
          { text: 'Markdown Examples', link: '/markdown-examples' },
          { text: 'Runtime API Examples', link: '/api-examples' }
        ]
      }
    ],

    socialLinks: [
      { icon: 'linkedin', link: 'https://www.linkedin.com/in/example' },
      { icon: 'instagram', link: 'https://www.instagram.com/example' },
      { icon: 'github', link: 'https://www.github.com/example' }
    ]
  }
})After you have made these changes, you can save the config.mts file.
When you open your browser and go to http://localhost:5174/, you will see that the title and description of your website have changed. You will also see that the social media links have been added to the header of your website.
Changing the color theme
To change the color theme of your website, you can update the variables of the default theme. You can do this by copying the vars.css file from the vars.css file located on the Vitepress repository and adding it to the ./.vitepress/theme/styles/ folder. The styles folder is not created by default, so you need to create it yourself.
After you have added the vars.css file to the ./.vitepress/theme/styles/ folder, you need to import it in the index.ts file in the ./.vitepress/theme/index.ts file. The index.ts file is the entry point of your theme, where you can import custom styles, components, and other elements that you want to add to your website.
The index.ts file looks like this:
// https://vitepress.dev/guide/custom-theme
import { h } from 'vue'
import type { Theme } from 'vitepress'
import DefaultTheme from 'vitepress/theme'
import './style.css'
import './styles/vars.css' // Imported the added vars.css file

export default {
  extends: DefaultTheme,
  Layout: () => {
    return h(DefaultTheme.Layout, null, {
      // https://vitepress.dev/guide/extending-default-theme#layout-slots
    })
  },
  enhanceApp({ app, router, siteData }) {
    // ...
  }
} satisfies ThemeAfter you have added the vars.css file to the ./.vitepress/theme/styles/ folder and imported it in the index.ts file, you can start changing the default colors and other styles.
In this tutorial we will add a custom red, pink and blue color to the vars.css file with 4 different shades of each color.
Go to the vars.css file and locate the :root selector after the explanation of the Colors: Palette. This is where you can add custom CSS variables to change the colors of your website. For me, it starts at line 46 in the vars.css file.
/* ... */

/**
  * Colors: Palette
  ...
*/

:root {
    --red-1: #ff1f4f;
    --red-2: #ff3a6b;
    --red-3: #ff587f;
    --red-soft: rgba(255, 31, 79, 0.14);

    --pink-1: #ff059f;
    --pink-2: #ff28b2;
    --pink-3: #ff4ac7;
    --pink-soft: rgba(255, 5, 159, 0.14);

    --blue-1: #0fc7ff;
    --blue-2: #34d1ff;
    --blue-3: #59dbff;
    --blue-soft: rgba(15, 199, 255, 0.14);

    /* ... */

}

/* ... */These variables are we going to use to change the colors of the website. You can change the colors to any color you like. After you have changed the colors, you can save the vars.css file.
Now that the colors are set, we need to update the brand colors of the website. Scroll down to the :root of the Colors: Function section. For me that is with the addition of the custom colors at line 224.
/* ... */

/**
    * Colors: Function
    ...
*/

:root {

    /* ... */

    --vp-c-brand-1: var(--red-1);
    --vp-c-brand-2: var(--red-2);
    --vp-c-brand-3: var(--red-3);
    --vp-c-brand-soft: var(var(--red-soft));

    /* ... */
}

/* ... */Now that we have that set up, finally we are going to add a gradient to the title of our website. Here we are going to use the red, pink and blue.
To get started go to :root of the Component: Home section. For me that is on line 529.
/* ... */

/**
    * Component: Home
    ...
*/

:root {

    /* ... */

    --vp-home-hero-name-color: transparent;
    --vp-home-hero-name-background: -webkit-linear-gradient(120deg,
            #ff1f4f 15%,
            #ff059f 40%,
            #0fc7ff 65%);
    --vp-home-hero-image-background-image: linear-gradient(-45deg,
            #ff1f4f 15%,
            #ff059f 40%,
            #0fc7ff 65%);
    --vp-home-hero-image-filter: blur(44px);

    /* ... */
}

/* ... */After you have made these changes, you can save the vars.css file.
When you open your browser and go to http://localhost:5174/, you will see that the colors of your website have changed. You will also see that the gradient has been added to the title of your website.
Tailwind CSS
While creating a website with Vitepress, it can be a time-consuming task to write custom CSS for every element on your website and in this case for each component that you create. To make this process easier, you can use a styling framework like Tailwind CSS.
Tailwind CSS is a utility-first CSS framework that comes with a lot of utility classes that you can use to style your website. This saves a lot of time because you don't have to write custom CSS for every element on your website. You can use the utility classes that Tailwind CSS provides to style your website.
For each normally when you want to create a title with a specific color, you would write custom CSS like this:
.title {
  color: red;
}With Tailwind CSS, you can use utility classes to style your title like this:
<h1 class="text-red-500">This is a title</h1>In this example, we are using the text-red-500 utility class to style the title with a red color. In the background, Tailwind CSS generates the custom CSS for you, so you don't have to write it yourself. In the background Tailwind CSS generates the following CSS:
.text-red-500 {
  color: #f56565; /* Red color */
}Tailwind installation
To install Tailwind CSS in your Vitepress project, you need to install Tailwind CSS with npm by running the following command in your terminal:
npm install tailwindcss --save-devAfter you have installed Tailwind CSS, you need to create a Tailwind CSS configuration file by running the following command in your terminal:
npx tailwindcss initWhen you run this command, Tailwind CSS will create a tailwind.config.js file in the root of your project. This file is the configuration file for Tailwind CSS, where you can configure the colors, fonts, and other styles of your website.
The tailwind.config.js file looks like this:
/** @type {import('tailwindcss').Config} */
module.exports = {
  content: [],
  theme: {
    extend: {},
  },
  plugins: [],
}After initializing Tailwind CSS, we need to take a few steps to make it work with Vitepress.
Create a tailwind.css file
To import Tailwind CSS in your Vitepress project, you need to add a tailwind.css file to the
./.vitepress/theme/styles/folder. This file is not created by default, so you need to create it yourself.In the tailwind.css file, you need to import Tailwind CSS by adding the following line of code:
css@tailwind base; @tailwind components; @tailwind utilities;This will import the base, components, and utilities of Tailwind CSS in your project. This way you can use the utility classes of Tailwind CSS to style your website.
Import Tailwind CSS in the index.ts file
After you have created the tailwind.css file, you need to import it in the index.ts file in the
./.vitepress/theme/index.tsfile. The index.ts file is the entry point of your theme, where you can import custom styles, components, and other elements that you want to add to your website.typescript// https://vitepress.dev/guide/custom-theme import { h } from 'vue' import type { Theme } from 'vitepress' import DefaultTheme from 'vitepress/theme' import './style.css' import './styles/vars.css' import './styles/output.css' // Imported the added tailwind.css file // ... the rest of the codeIf you've looked at the code above, you can see that we did not import the tailwind.css file itself, but the output.css file. This is because we are going to write the output of the tailwindcss command to the output.css file. This way we can use the utility classes of Tailwind CSS to style our website.
Write a watch script to generate the output.css file
Because Tailwind CSS' watch script doesn't always work an every device, we will use nodemon to watch changes in our files and generate the output.css file. To do this, we need to install nodemon by running the following command in your terminal:
bashnpm install nodemon --save-devAfter you have installed nodemon, you can add a watch script to your package. Also add a build script to generate the output.css file. Replace the scripts in the package.json file with the following code:
json// ... other code "scripts": { "docs:dev": "npm run tailwind:build && vitepress dev", "docs:build": "npm run tailwind:build && vitepress build", "docs:preview": "vitepress preview", "tailwind:build": "npx tailwindcss -i ./.vitepress/theme/styles/tailwind.css -o ./.vitepress/theme/styles/output.css", "tailwind:watch": "npx nodemon -e vue --exec \"npx tailwindcss -i ./.vitepress/theme/styles/tailwind.css -o ./.vitepress/theme/styles/output.css\"" }, // ... other codeIn the script above we are using nodemon to watch for changes in the tailwind.css file. When a change is detected, nodemon will run the tailwindcss command to generate the output.css file. This way you can use the utility classes of Tailwind CSS to style your website.
Configure the
tailwind.config.jsfileCurrently, if you would run the
tailwind:watchscript, nothing would happen. This is because we need to add the content that Tailwind CSS should watch for changes. This means that Tailwind CSS needs to know which files to monitor for newly added Tailwind classes.In this project, we want to monitor the Javascript, Typescript, and Vue files in the folders specified below.
javascript/** @type {import('tailwindcss').Config} */ module.exports = { mode: 'jit', important: '#app', content: [ './.vitepress/theme/theme-components/*.{vue,js,ts}', './components/**/*.{vue,js,ts}', ], theme: { extend: {}, }, plugins: [], }In the new version of the
tailwind.config.jsfile, we have added themodeproperty with the valuejit. This is the Just-In-Time mode of Tailwind CSS. This mode only generates the CSS that you use in your project, which makes the CSS file smaller and faster to load. It also makes it possible to use custom non prior defined amount of width, height, padding, margin, etc. classes.For example, sometimes you want a specific width, height, etc that's not out of the box possible with Tailwind, but you don't want to add it in the config. By adding the
mode: 'jit'you can use the utility classes likew-[123%]orh-[100vh]to set a specific width or height.For more information about the Just-In-Time mode of Tailwind CSS, you can take a look at the official documentation.
After you have made these changes, you can save the tailwind.config.js file. Now everything is ready for development with Tailwind CSS. Let's try it out in the next section Vue Components.
Vue Components
In Vitepress, you can create custom Vue components that you can use to create custom elements for your website. Vue components are reusable elements that you can use to create custom elements for your website. You can use Vue components to create custom elements such as a header (for example a banner), a footer (for example information about the author), etc.
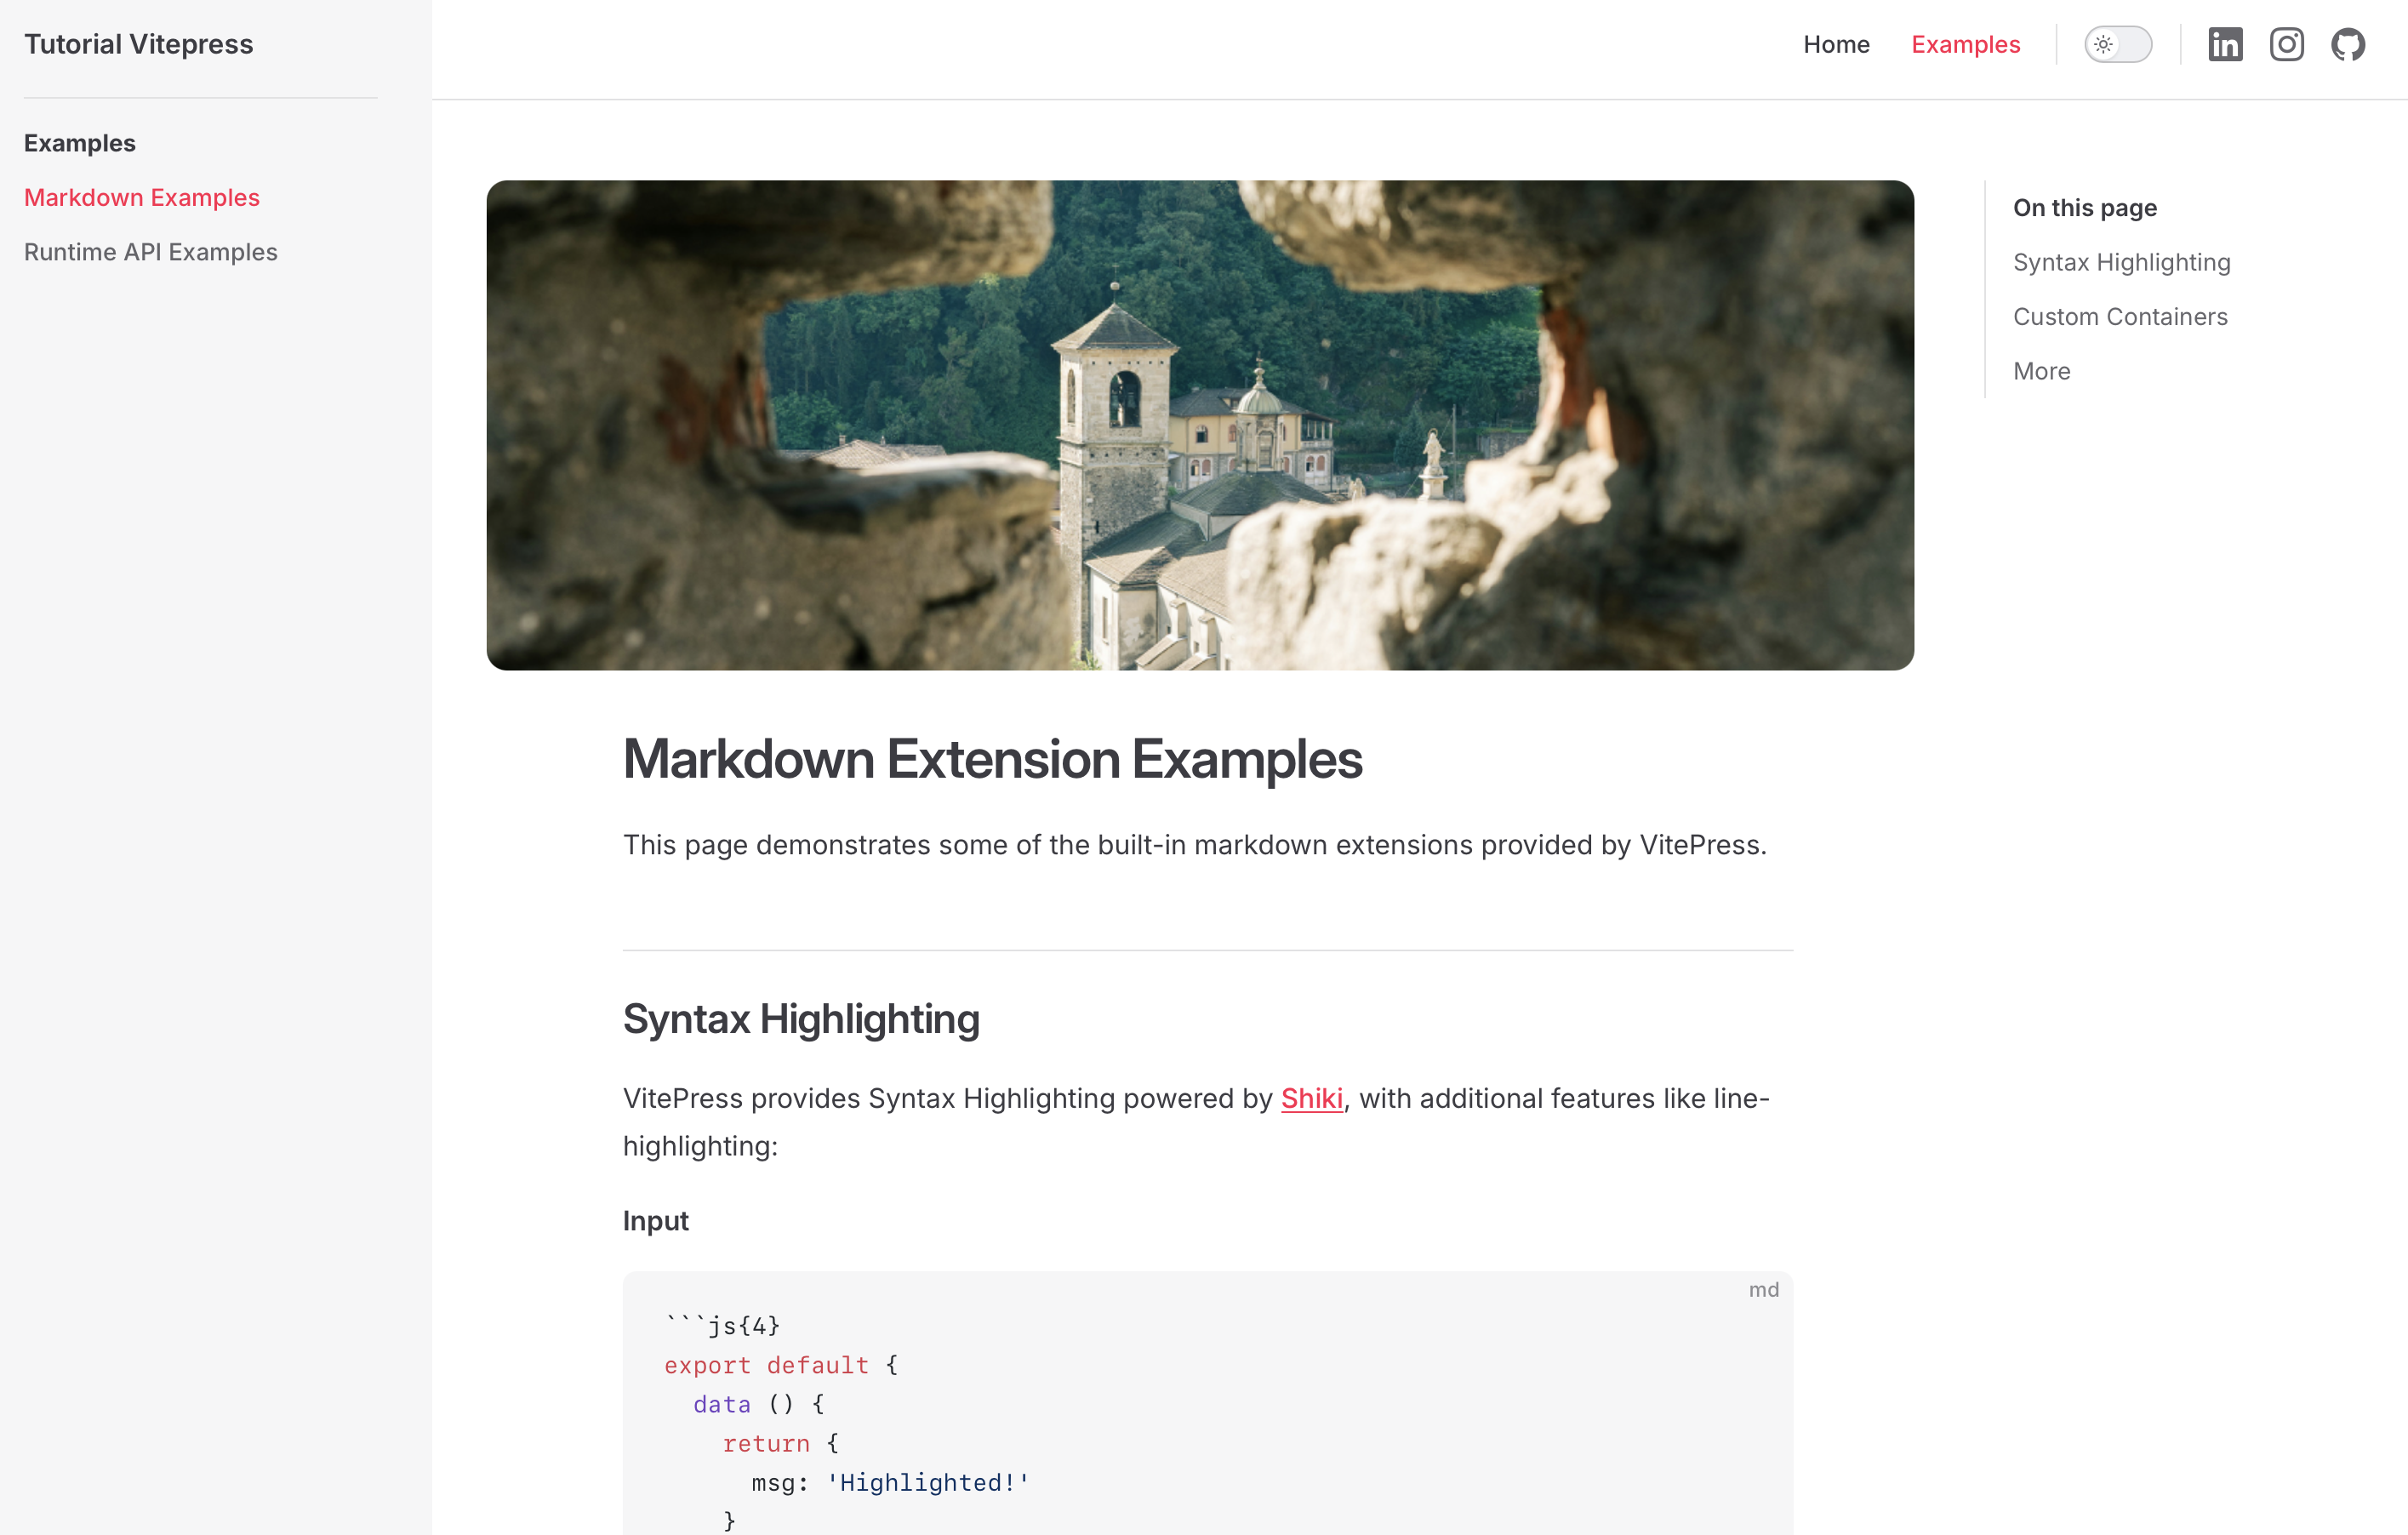
In this tutorial, we will create a Vue component that shows a banner with an image and the title of the page. The banner will only be shown when the front matter of the page contains a thumbnailUrl. If the front matter does not contain a thumbnailUrl, the banner will not be shown.
Also we are going to add a custom footer to the website. This footer will contain information about the author that wrote the page with links to the social media of the author.
Banner
To create a banner we will need to take a couple of steps. First create the Banner Vue Component, which we are going to style with Tailwind css. Than we need to add it to the index.ts file located in the theme folder. And then ofcourse test it. Let's get started!
Create the component
Create a new file called
Banner.vuein the./.vitepress/theme/theme-components/folder. This is the folder where you can add custom Vue components for your website. At the moment this folder is not created, so you need to create it yourself.In vue components we have access to JavaScript code using the
<script setup>tag. This tag allows us to write JavaScript code in the Vue component.In the Banner.vue file, we are going to use the thumbnailUrl from the front matter of the page to show an image in the banner. This means that we need to import the
useDataandwithBasefunctions from Vitepress to get the data from the front matter of the page.vue<script setup> import { useData, withBase } from 'vitepress' const { page, frontmatter } = useData() </script> <template> <div v-if="frontmatter.thumbnailUrl" class="mb-8 min-[1280px]:max-w-[76%]"> <img :src="withBase(frontmatter.thumbnailUrl)" :alt="frontmatter.title" class="w-full h-72 object-cover rounded-[12px]" /> </div> </template>In the code above, we are creating a Vue component that shows an image if the front matter contains a thumbnailUrl. The image is displayed with the title of the page as the alt text. The banner will only appear when the front matter contains a thumbnailUrl. This is possible by using the
v-ifdirective to only show the image when the front matter contains a thumbnailUrl.If you look closely, you can see that there are
:in front of thesrcandaltattributes. This is because in Vue all dynamic data needs to have a:in front of the attribute. This is because Vue needs to know that the value is dynamic and should be updated when the data changes. So by the class attribute, the:is not needed because it is a static value.The
withBasefunction is used to get the base URL of the website. This is needed because the image is located in the assets folder of the website. ThewithBasefunction adds the base URL of the website to the image URL, so that the image can be displayed on the website.Add the component to the index.ts file
After you have created the Banner component, we will need to configure it that it will be displayed on the website when there is a thumbnailUrl in the front matter of the page.
To do this, you need to import the Banner component in the index.ts file in the
./.vitepress/theme/index.tsfile. We also need to specify where the Banner component should be displayed on the website. In this case, we want to display the Banner component at the top of the page, before the content of the page in the docs layout. This is possible by using thedoc-topslot.typescript// https://vitepress.dev/guide/custom-theme import { h } from 'vue' import type { Theme } from 'vitepress' import DefaultTheme from 'vitepress/theme' import './style.css' import './styles/vars.css' import './styles/output.css' import Banner from './theme-components/Banner.vue' // Imported the Banner component export default { extends: DefaultTheme, Layout: () => { return h(DefaultTheme.Layout, null, { // https://vitepress.dev/guide/extending-default-theme#layout-slots 'doc-top': () => h(Banner), // Added the Banner component to the doc-top slot }) }, enhanceApp({ app, router, siteData }) { // ... } } satisfies ThemeIn the code above, we are importing the Banner component and adding it to the layout of the website. The Banner component will be shown at the top of the page, before the content of the page, because we are using the
doc-topslot. This way the Banner component will only be shown when the front matter of the page contains a thumbnailUrl.Test the component
Now that we have created the Banner component and added it to the index.ts file, we can test it by adding a thumbnailUrl to the front matter of the page. To do this, we first need to add a thumbnail image to the assets folder of the website.
The image should be added to the
./public/assets/folder. Name the imageexample-image.{jpg, png, etc}. After you have added the image to the assets folder, you can add the thumbnailUrl to the front matter of the page.For me, the image is located in the
./public/assets/folder with the nameexample-image.jpg. I will add the thumbnailUrl to the front matter of themarkdown-examples.mdlike this:markdown--- thumbnailUrl: /assets/example-image.jpg --- // The content of the pageIn the code above, we are adding a thumbnailUrl to the front matter of the
markdown-examples.mdpage. The thumbnailUrl is the URL of the image that is located in the assets folder of the website. The image will be displayed in the Banner component at the top of the page, before the content of the page.INFO
It is possible that when you already have the development server running, you need to restart the server to see the changes with styling and components. While building, the Tailwind CSS output file is generated.
Another option I recommend is to run the
tailwind:watchscript. This script will watch for changes in the tailwind.css file and generate the output.css file when a change is detected. This way you can see the changes in the Tailwind CSS output file in real-time.If everything went well, you should see the image in the Banner component at the top of the page, before the content of the page. The image will only be shown when the front matter of the page contains a thumbnailUrl.
Now that we have created the Banner component and know the workflow of creating a Vue component, you can create more Vue components for your website.
Adding content
Now that we have set up the website and added custom styles and components to the website, we can start adding content to the website.
First let's create a new folder where our blog posts will be located. Create a new folder called blogs in the root of the project.
After you have created the blogs folder, you can add 5 new markdown files to the blogs folder. Name the markdown files blog-1.md, blog-2.md, blog-3.md, blog-4.md, and blog-5.md.
In each markdown file, you can add content for the blog post. Remember to add the front matter to the markdown file with for each blog the thumbnailUrl and a title.
For example, the content of the blog-1.md file could look like this:
---
thumbnailUrl: /assets/blog-1.jpg
title: Blog 1
---

# Blog 1

This is the content of blog 1.

Lorem ipsum dolor sit amet, consectetur adipiscing elit. Sed non risus. Suspendisse lectus tortor, dignissim sit amet, adipiscing nec, ultricies sed, dolor. Cras elementum ultrices diam. Maecenas ligula massa, varius a, semper congue, euismod non, mi.

Ex occaecat consequat aute quis consequat ut dolor in. Amet sint labore sit anim consequat irure ad et qui sunt cupidatat est duis exercitation. Eu qui Lorem magna voluptate incididunt ad sunt duis nulla ad incididunt id eiusmod. Id nisi et veniam dolor proident sint veniam sunt consectetur elit ex incididunt aliquip aliquip. Ad ad eiusmod laborum enim deserunt cillum exercitation exercitation dolor cillum.

Voluptate id Lorem cupidatat ea. Aliqua laborum duis consequat do elit pariatur. Excepteur consectetur ea velit nisi. Sunt culpa Lorem cupidatat adipisicing commodo dolore. Consectetur sint officia esse voluptate tempor incididunt ipsum nostrud culpa commodo elit eiusmod.

Mollit ex duis esse ea non labore minim nisi laboris laboris. Ut excepteur qui et elit quis tempor aliquip exercitation enim voluptate occaecat mollit consectetur. Amet exercitation aute commodo magna quis sit duis. Commodo enim ea ullamco aliqua aliquip in consectetur ullamco sit veniam anim.Add content to the other blog posts in the same way. After you have added content to the blog posts, you can open your browser and go to http://localhost:5174/blogs/blog-1 to see the content of the blog post.
Currently, the blog is not visible in the navigation of the website. This can be possible by adding the blog posts to the navigation of the website. To do this, you need to add the blog posts to the nav array in the config.mts file.
    // ... the rest of the config

    themeConfig: {
      // ... the rest of the theme config

      nav: [
        { text: 'Home', link: '/' },
        { text: 'Examples', link: '/markdown-examples' },
        { text: 'Blogs', link: '/blogs' } // Added the blog post to the nav array
      ],

      // ... the rest of the theme config
}Now when you open your browser and go to http://localhost:5174/, you will see that the blog posts are added to the navigation of the website. You can click on the blog item in the navigation, vitepress returns a 404 error. This is because we need to create a blog index page.
To create a blog index page, you need to create a new markdown file called index.md in the blogs folder. In the index.md file, you can add a title and description for the blog index page.
When you have created the index.md file and added content to the file, you can now open your browser and go to http://localhost:5174/blogs to see the blog index page.
What you may notice is that the sidebar is not dynamic and more importantly, the blog posts are not shown in the sidebar. In the next section, we will take a look at how to make the sidebar dynamic, have different sidebar items for different navigation pages, and show the blog posts in the sidebar.
Oh! The sidebar and navigation is not dynamic
When you have added content to the website, you may notice that the sidebar and navigation are not dynamic. This means that the sidebar and navigation are not updated when you add new content to the website. This is because the sidebar is static and does not change when you add new content to the website.
But ofcourse there is a solution for this. Therefor we need to install a dependency called vitepress-sidebar by running the following command in your terminal:
npm install vitepress-sidebarAfter you have installed the vitepress-sidebar dependency, we can configure the sidebar to be dynamic. To do this, you need to add the vitepress-sidebar plugin to the config.mts file.
import { generateSidebar } from 'vitepress-sidebar';
// ... the rest of the config

// https://vitepress.dev/reference/site-config
export default defineConfig({
  // ... the rest of the config

  themeConfig: {
    // ... the rest of the theme config

    sidebar: generateSidebar([
      {
        documentRootPath: '/blogs/',
        useTitleFromFrontmatter: true,
        capitalizeFirst: true,
        resolvePath: '/blogs/',
      },
      {
        documentRootPath: '/',
        useTitleFromFrontmatter: true,
        capitalizeFirst: true,
        resolvePath: '/',
      }
    ])
  }
})INFO
It's possible that you need to restart the development server to see the changes in the sidebar and navigation.
When you have done everything correctly, you should see that the sidebar and navigation are now dynamic. So that when you visit http://localhost:5174/blogs/ you will see the blog posts in the sidebar like this:
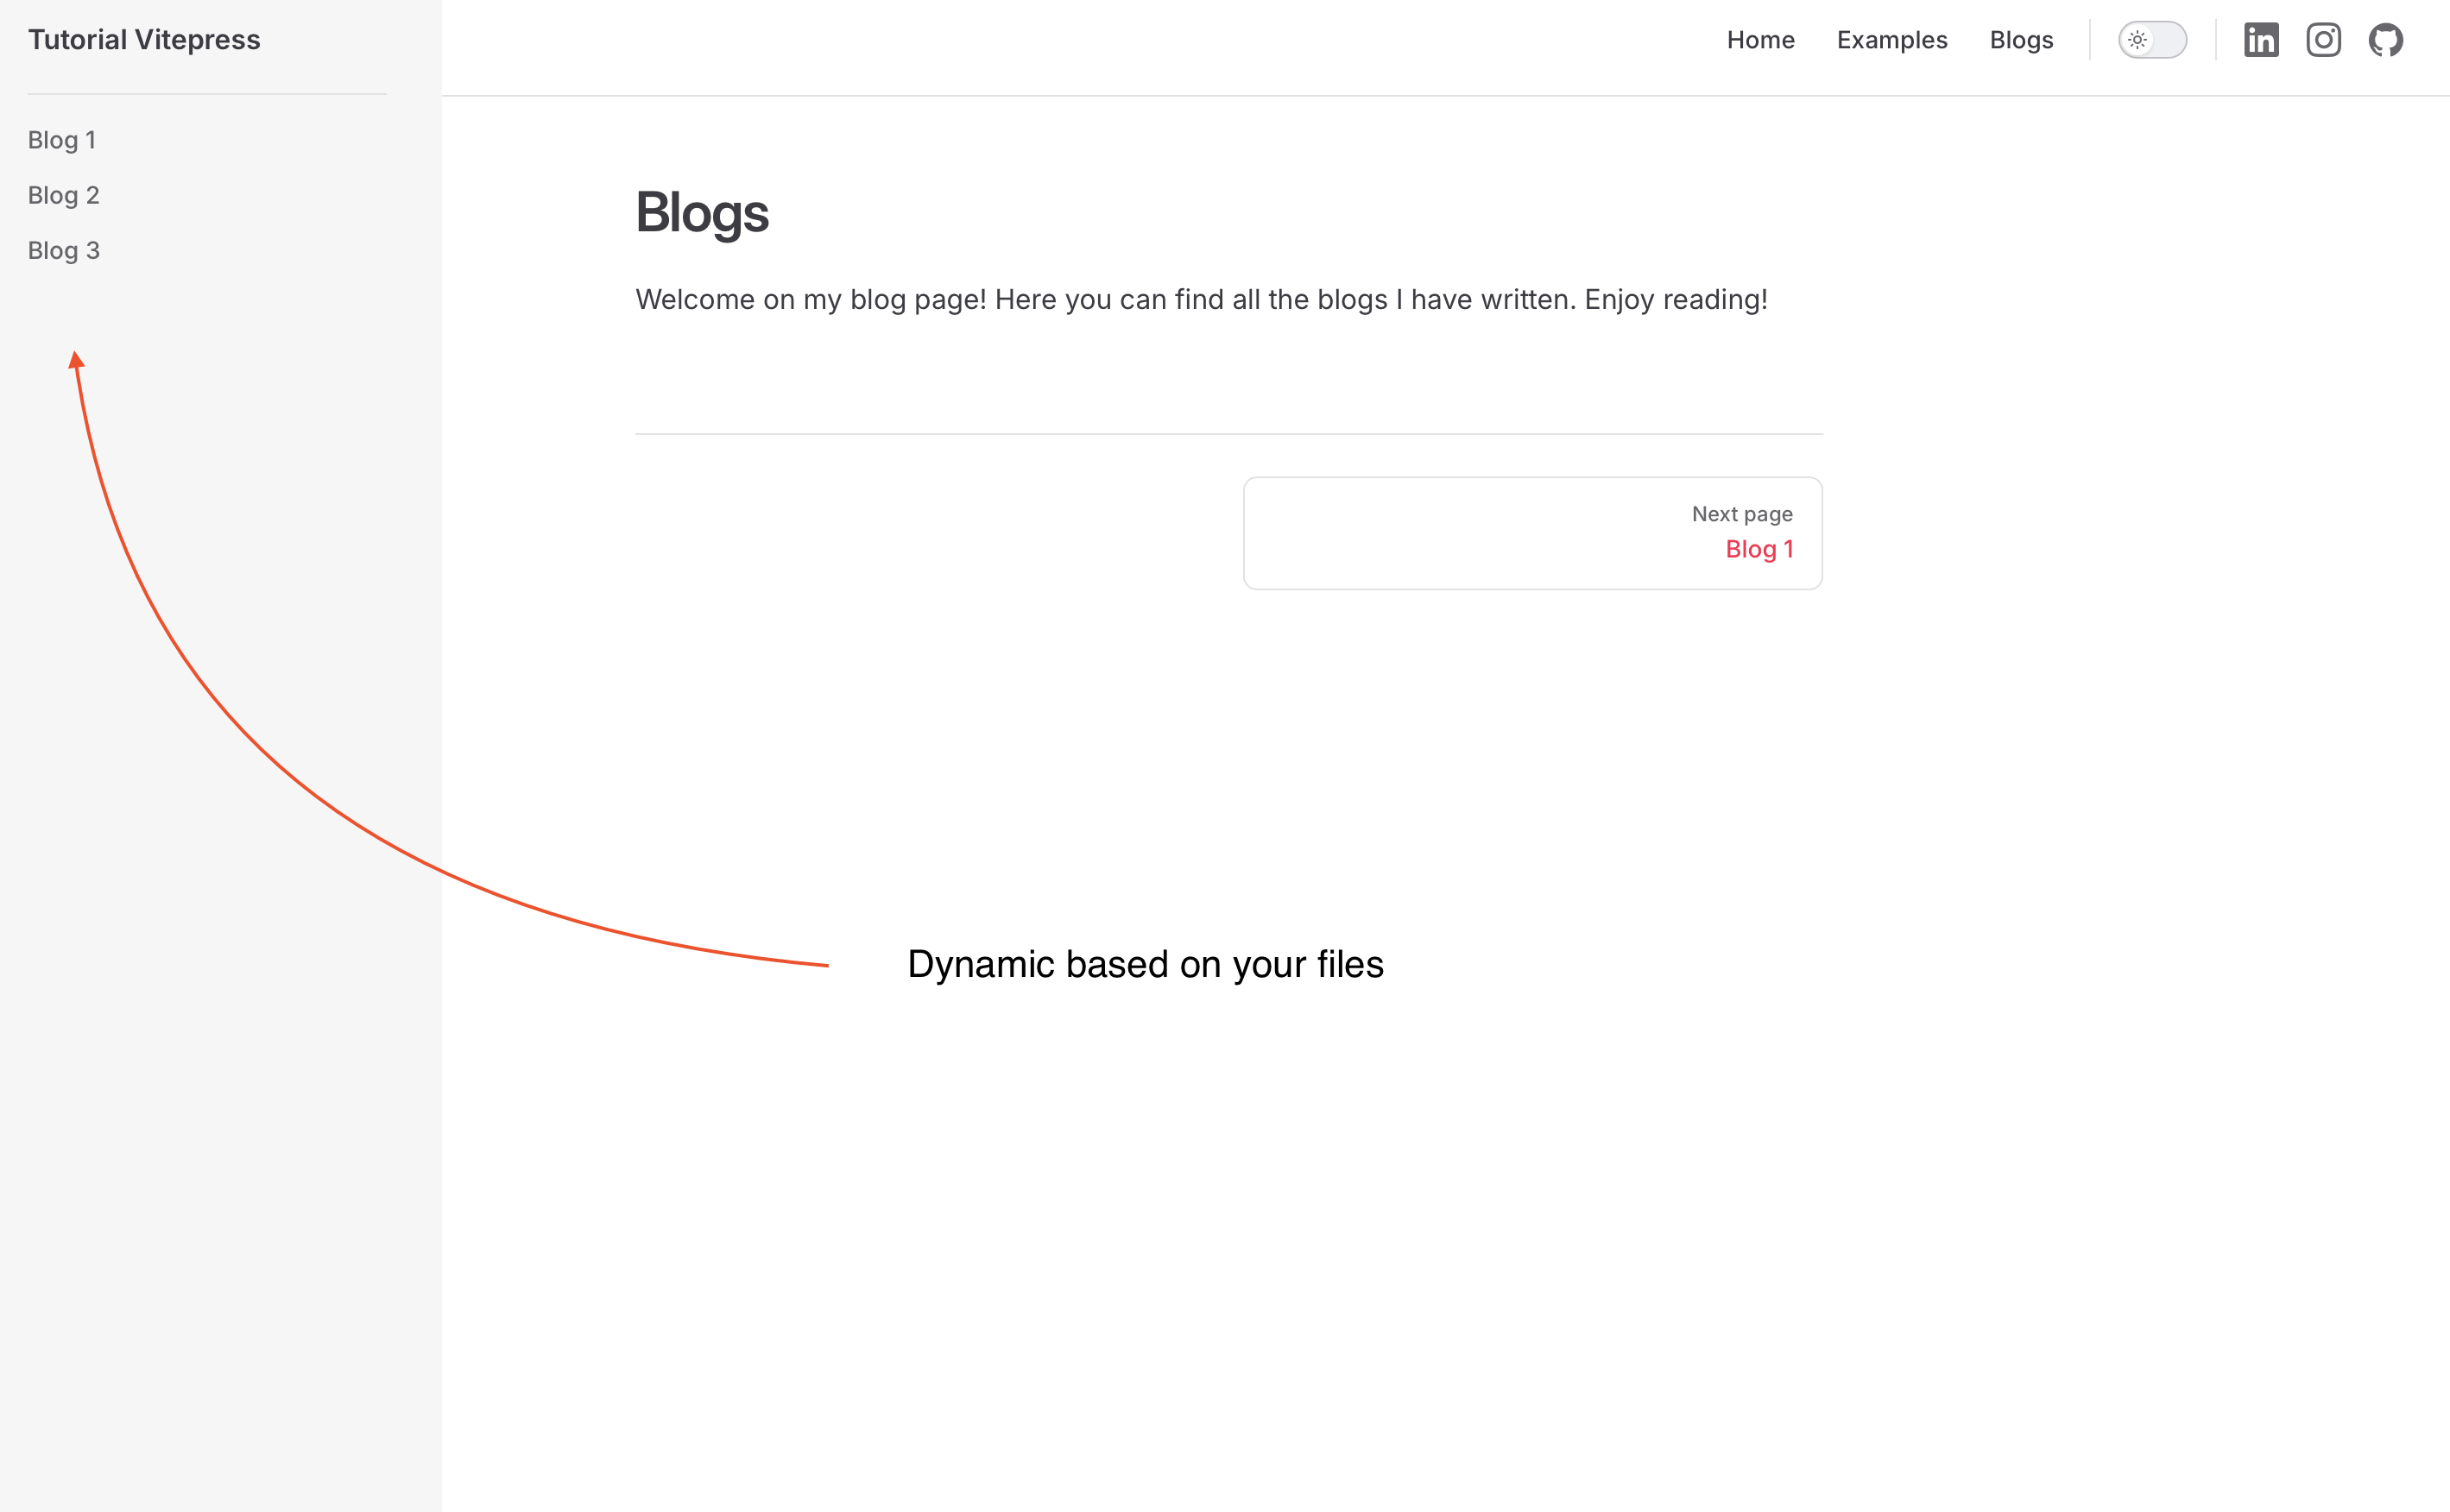
To conclude, we have created a dynamic sidebar and navigation for the website. This way you can add new content to the website and the sidebar and navigation will be updated automatically. This makes it easier to add new content to the website and keep the sidebar and navigation up to date.
Final thoughts
In this tutorial, we have created a Vitepress website with custom styles and components. We have created a dynamic sidebar and updated the navigation of the website. We have also added blog posts to the website and created a blog index page.
In this tutorial, we have seen how easly it is to create a website with Vitepress. And how dynamic vitepress is with the use of plugins and custom components. Vitepress is a great tool to use as a base and to build upon with custom styles and components.
I hope this tutorial has helped you to get started with Vitepress and to create your own website.