Fastify
Introduction to Fastify
As the demand for efficient, high-performing APIs increases in today's world, the complexity of applications aligned with these APIs also rises. Developers face the challenge of meeting these demands. Fastify is one of the tools that helps developers achieve this. Fastify stands for building fast, reliable, and scalable APIs.
Fastify is designed to handle a huge amount of requests with minimal overhead. It uses an asynchronous programming model that leverages Node.js’s non-blocking I/O, allowing developers to write code more efficiently. This makes managing multiple tasks simultaneously without blocking the event loop seamless.
Fastify also includes built-in support for JSON schema validation, ensuring data quality.
In this tutorial, I will guide you through the setup of a Fastify server, defining various routes, using validation, and, last but not least, using plugins and middleware in combination with Fastify. By the end of this tutorial, you will have a fine understanding of Fastify and its uses.
In this tutorial, you will create an easy register, login, and welcome system, along with a books page and a book details page. You will accomplish this by adding routes, using validation, plugins, middleware, error handling, authentication, and more. Note that you can freely style anything you want with CSS or plugins like Tailwind.
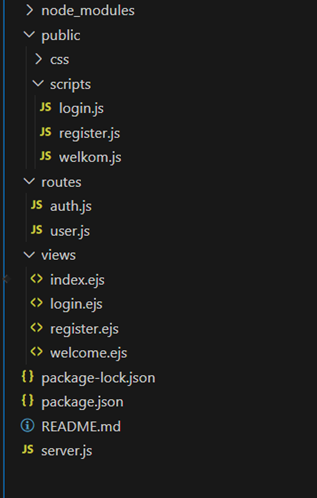
Folder Structure
Before we start with the installation, we will set up the folder structure (feel free to use a better structure if you prefer). We will need:
- A
publicfolder containing:- A
cssfolder. - A
scriptsfolder.
- A
- A
viewsfolder for:index.htmlregister.htmllogin.htmlwelcome.htmlbooks.htmlbooks-detail.html
- A
routesfolder containing:auth.jsuser.js
- A
server.jsfile in the root of the project.
Your end result should look something like this:
The other documents like the package.json will be added in the installation
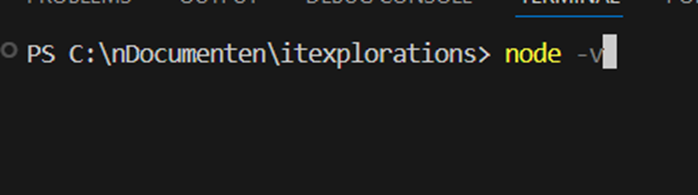
Instalation
Before we start with installing fastify itself, we will begin with checking if u are on the newest version of node.js, because the version of node.js must be 12 or higher. You can check this by running this command in your terminal:
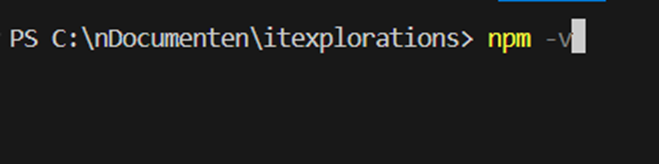
You should also check if you are running on the latest version of npm, check your version by typing this in your terminal:
Installation of fastify
With the previous steps followed correctly, we can now install fastify’s latest version, Run this command:

The installation might take a while.
When the download is done you will see a confirmation message stating fastify and its dependencies have been added to your project, if this is not the case, check previous steps. The next step is to initialize npm, you do this by running this command:
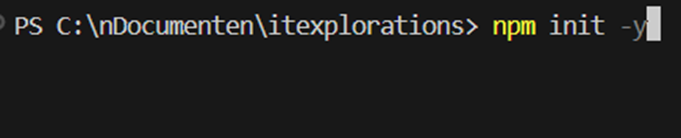
This should add a package.json to your project.
Setting up the project
With fastify installed, you can now continue by going to the ‘server.js’, in this document you will define all your routing
Writing your fastify server
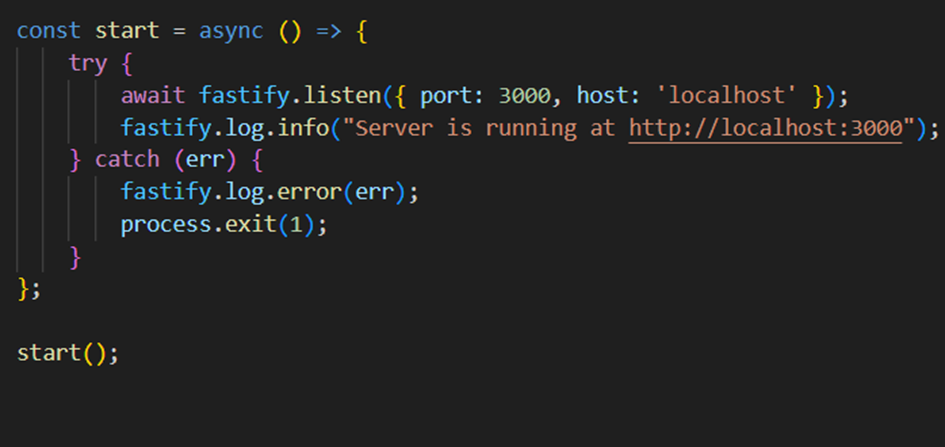
The first thing you need to do is require fastify, and start up the server like this:

home page
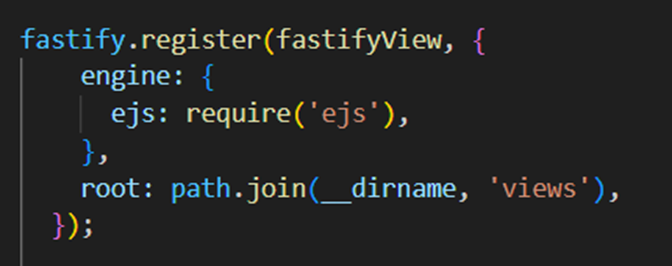
First thing we need to do is install @fastify/view ejs we will use this to display the page, after the installation require it at the top of the screen like this:

To make the home and other pages accessible via the browser, you need a GET route in the server-side code. Instead of rendering static EJS files from the public folder, you are now using EJS templates to dynamically generate the page. In Fastify, this is done by registering the @fastify/view plugin. This plugin allows the server to render EJS templates stored in the views folder.
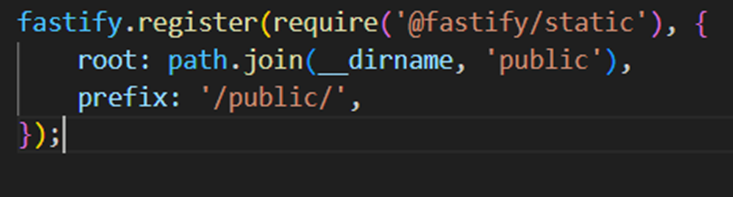
Also you will need The fastify-static plugin it makes files in the public folder accessible to the browser:
Note that i choose to require instead of import, here is an example of ho wit would look with importing fastify/static:
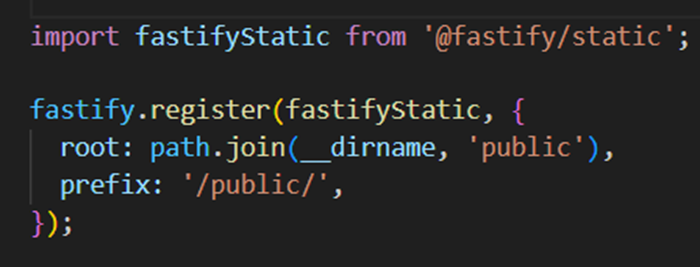
Explanation of Static File Setup
Here’s what this does:
- Registering the Plugin: The
fastify-staticplugin is registered to serve static files. - Setting the Root Directory: The
rootoption specifies the directory where the static files are located, in this case, thepublicfolder. - Using a Prefix: The
prefixoption specifies the URL path prefix (/public/) for accessing these files.
Once that is set up, we can move on to the actual home page.
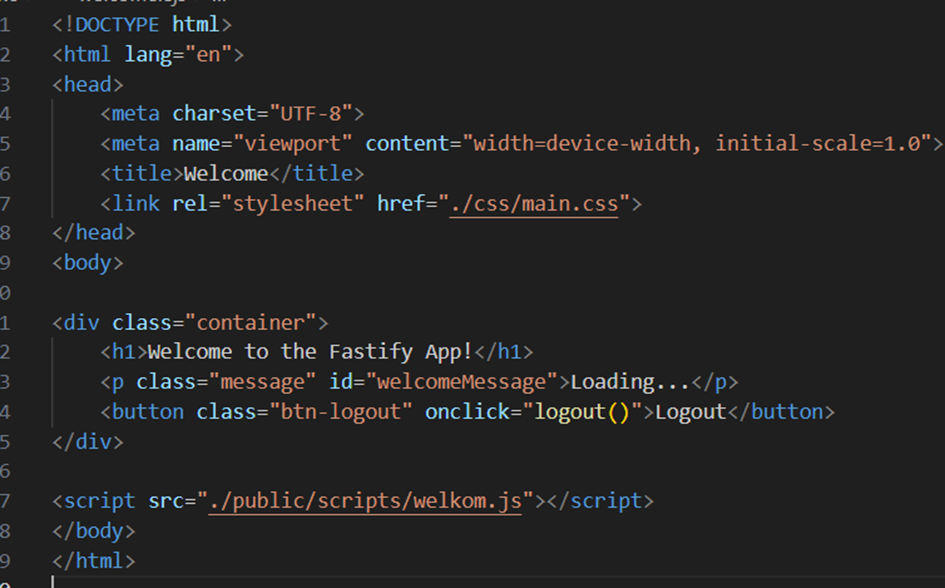
Create the EJS File for the home Page
The home page will allow users to either login or register by clicking on the links. Here's the EJS file (index.ejs), which includes the form and fields:
views/index.ejs
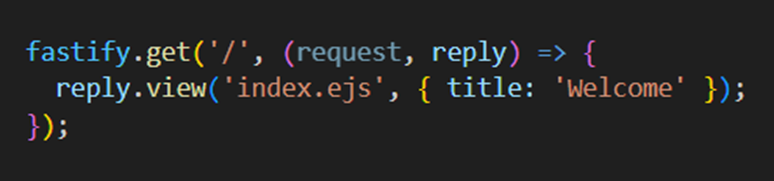
Set Up the GET Route for the Home Page
To serve the home page, you need a GET route that renders the index.ejs file. Here's how the GET route is set up in Fastify:
Route Explanation
- GET /: This route serves as the home when users open the app with
/in their browser. - The
reply.view()function is used to render theindex.ejsfile and pass dynamic data to the page (e.g., the title).
Code Implementation
Register page
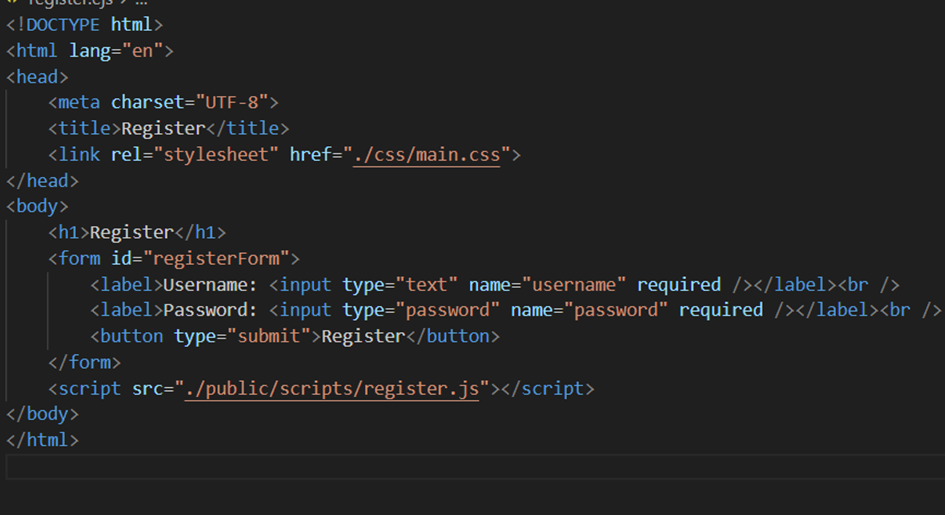
Create the EJS File for the Registration Page
The registration page will allow the user to input details like username and password. Here's the EJS file (register.ejs), which includes the form and fields:
views/register.ejs
Set Up the GET Route for the Registration Page
To serve the registration page, you need a GET route that renders the register.ejs file. Here's how the GET route is set up in Fastify:
Route Explanation
- GET /register: This route serves the registration form when users navigate to
/registerin their browser. - The
reply.view()function is used to render theregister.ejsfile and pass dynamic data to the page (e.g., the title).
Code Implementation:

With this setup, you can access the register page by navigating to http://localhost:3000/register
Create the Front-End Logic for Handling the Registration
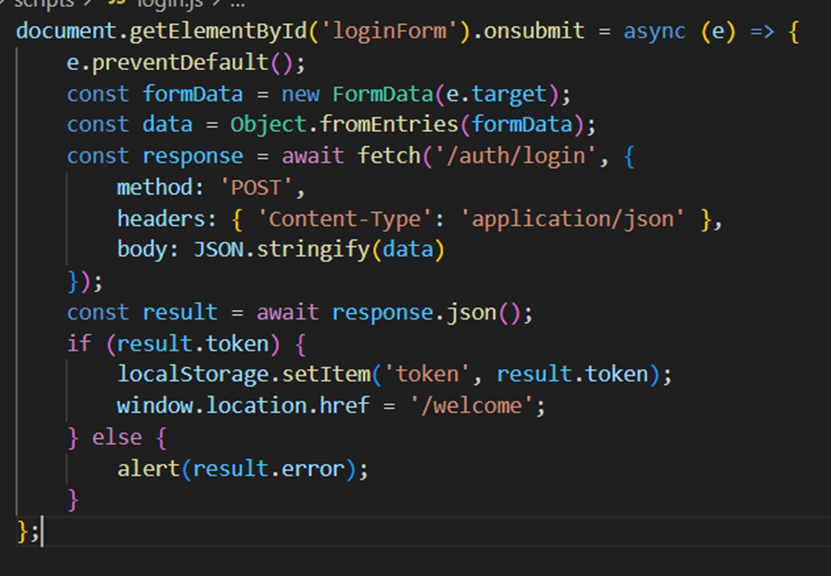
Next, create a register.js file to add the front-end logic. This script handles form submissions and sends the data to the back-end. Here’s a basic example:
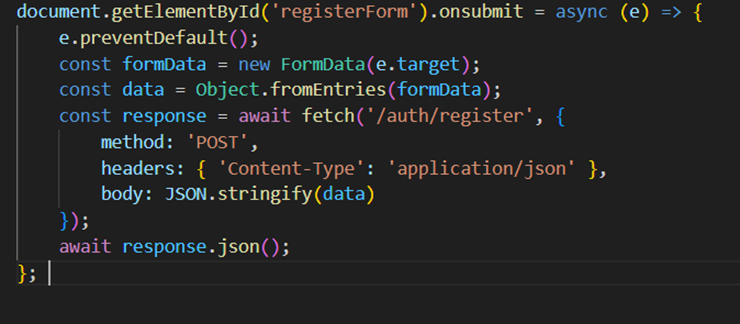
How it Works
Preventing Default Behavior:
Thee.preventDefault()method stops the form's default action (reloading the page) when the submit button is clicked.Collecting Form Data:
- The
FormDataobject automatically collects all input values from the form (e.targetreferences the submitted form element). - The
Object.fromEntries()method converts this form data into a plain JavaScript object for easier manipulation.
- The
Sending Data to the Server:
- The
fetchfunction sends the data as a JSON object to the/auth/registerendpoint using a POST request. - The
Content-Type: application/jsonheader tells the server that the request body contains JSON data.
- The
Handling the Server's Response:
- The
response.okproperty checks if the server successfully processed the request. - On success, the user is redirected to the login page with a success alert.
- On failure, an error message is displayed, either from the server (
result.error) or as a fallback message.
- The
The POST Route for User Registration
The POST route for user registration is defined to:
- Validate incoming data using a schema.
- Store user data securely.
- Handle potential errors.
Your implementation uses Fastify's built-in schema validation and a Map to store users. Here's a breakdown of the provided code:

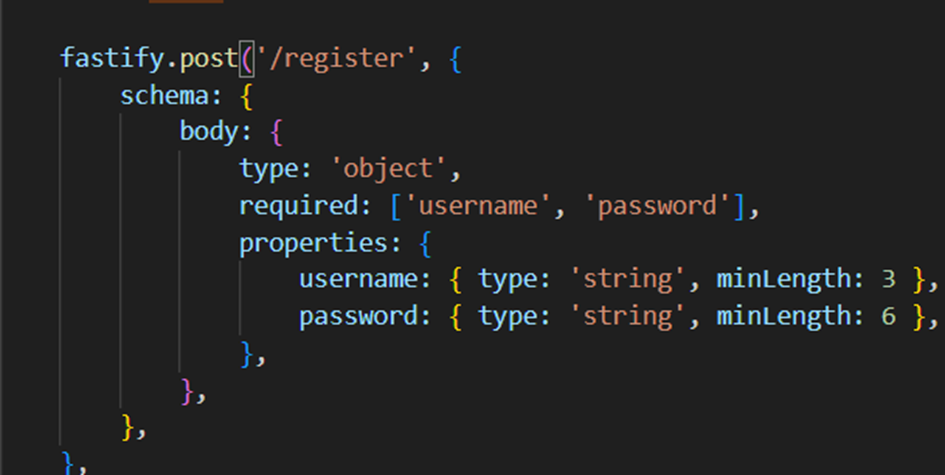
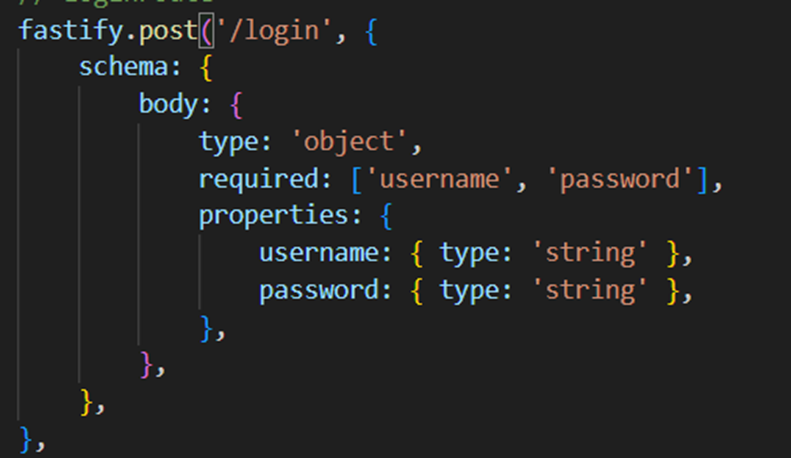
Data Storage Using a Map: User data is temporarily stored in a Map, with the username as the key and an object (e.g., { password }) as the value. This is suitable for testing but should be replaced with a database for production. Schema Validation: The route uses Fastify's JSON Schema to validate the incoming request body.
- The username must be a string with at least 3 characters.
- The password must be a string with at least 6 characters. If validation fails, Fastify automatically sends a 400 Bad Request response. note that we will use the same function tol login the user.
Provide User Feedback on Registration Success or Failure
To notify users of the registration outcome, the client-side script already includes alerts for success and failure. You can enhance this by sending more descriptive responses from the server.
For instance:
If registration succeeds, send a message like:
"User registered successfully. Please log in."If validation fails, provide specific error messages such as:
"Password must be at least 8 characters long."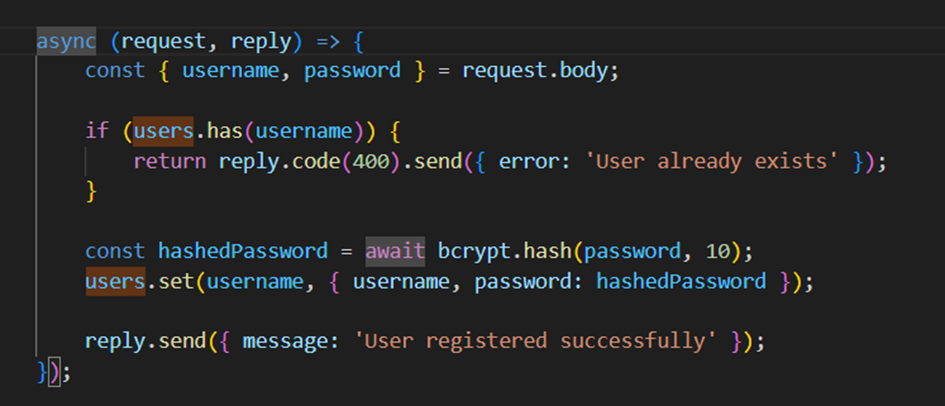
This happens in the same function where the register and login will be
To make sure the register page uses these function you can add this to the server.js:

Integrate Plugins for Handling Form Data
the @fastify/formbody plugin, enabling Fastify to parse URL-encoded form data, Fastify requires the @fastify/formbody plugin. Install and register it as follows:
- . It should look something like this:

Final Steps
Once all steps are complete, you should be able to:
- Access the registration page by visiting
http://localhost:3000/register. - Submit a username and password.
- Receive feedback indicating whether the registration was successful.
- Be redirected to the login page if the registration succeeds.
With the registration page functional, you can move on to setting up the login page, which involves handling existing users, adding authentication, and including error handling for failed login attempts.
Login Page
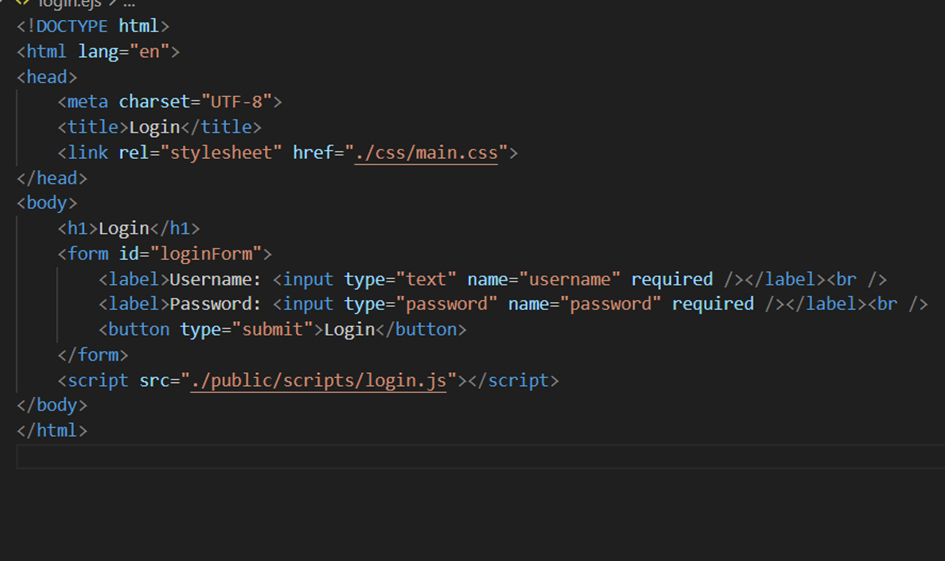
Create the Basic EJS File for the Login Page
Start by creating an EJS file (login.ejs) that contains a form for users to input their login credentials. Ensure the form has an ID of loginForm so the front-end JavaScript can interact with it.
The form will typically include:
- An input field for the username.
- An input field for the password.
- A submit button to trigger the login process.
It should look something like this:
Set Up the GET Route for the Registration Page
To serve the login page, you also need a GET route that renders the login.ejs file. Here's how the GET route is set up in Fastify:
Route Explanation
- GET /login: This route serves the login form when users navigate to
/loginin their browser. - The
reply.view()function is used to render thelogin.ejsfile and pass dynamic data to the page (e.g., the title).
Code Implementation:

Front-end javascript
After this step you make a login.js where you set the add logic for the front-end, this is similar tot he register form, but with the addition of putting a token in the localstorage so it knows the user is authenticated to login, and move on tot he welcome page:
Set Up the Authentication Logic in the auth.js File
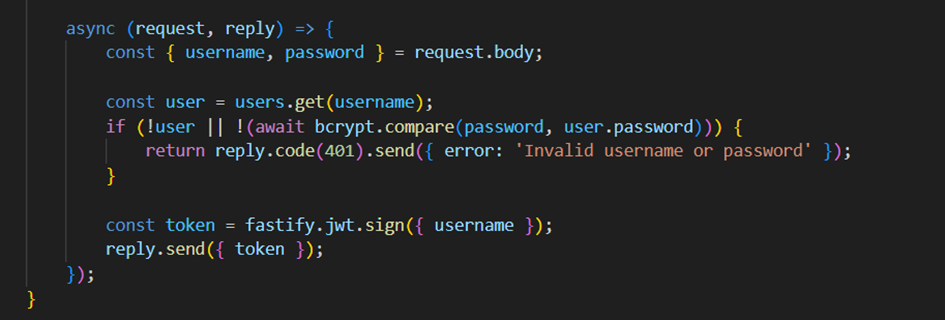
In the back-end, create a POST route to handle login requests. This route will validate the provided username and password and generate a JSON Web Token (JWT) upon successful authentication.
- Validation Schema: Define a schema to validate that the username and password fields are both provided and meet specific requirements (e.g., minimum length).
- Authentication: Compare the username and password against the stored user data to ensure they are correct.
- Token Generation: If authentication is successful, generate a JWT containing the user’s information (e.g., username). This token will be used for subsequent requests to verify the user's identity.
- If the credentials are invalid, the server should respond with an appropriate error message (e.g., "Invalid username or password").
The result should be something like this:
The checking if the user exist etc should look like this:
- the @fastify/jwt plugin with Fastify, enabling JWT-based authentication. It should look something like this:
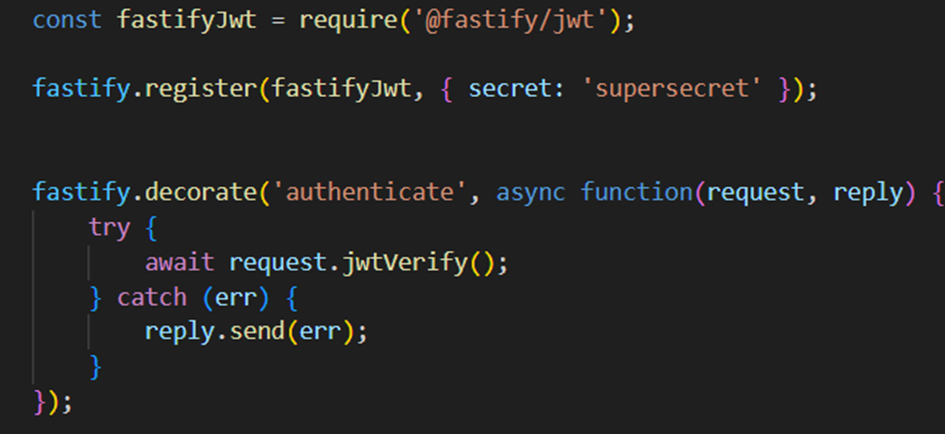
The .decorate() method is used by Fastify to add new properties or functions to the Fastify instance. Here, we’re decorating Fastify with a new method called authenticate.
After completing these steps:
- Users can navigate to the login page at
localhost:3000/login. - They can log in using the credentials created during registration.
- The application verifies the credentials and stores a JWT in localStorage upon success.
- Authenticated users are redirected to the welcome page, where they see a personalized greeting and can log out to return to the login page.
This setup ensures secure and efficient user authentication while providing a seamless user experience.
Welcome Page
Create the Basic EJS File for the Welcome Page
The first step is to create a simple EJS structure for the welcome page. This will serve as the foundation for the user interface. The page will contain elements for displaying a welcome message and a logout button. The layout ensures that the user sees a personalized greeting and has a clear way to log out of their account.
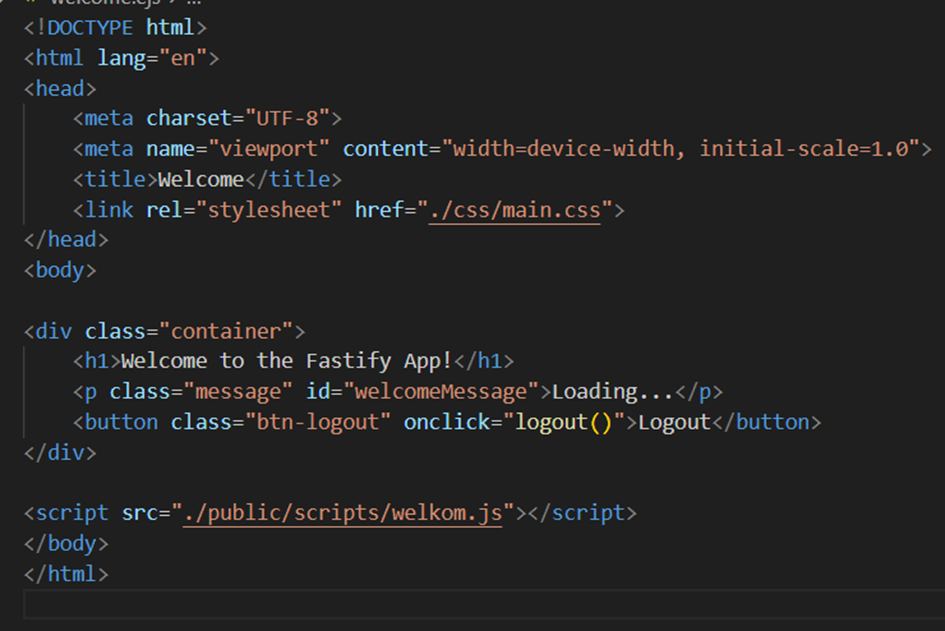
Here, the <h1> tag with the id="welcome-message" will dynamically display the user's name, and the id="logout-button" will trigger the logout functionality.
Next Up: Set Up the GET Route for the Welcome Page
To serve the welcome page, you also need a GET route that renders the welcome.ejs file. Here's how the GET route is set up in Fastify:
Route Explanation
- GET /welcome: This route serves as the welcome page when users navigate to
/welcomein their browser. - The
reply.view()function is used to render thewelcome.ejsfile and pass dynamic data to the page (e.g., the title).
Client-Side Logic in welkom.js
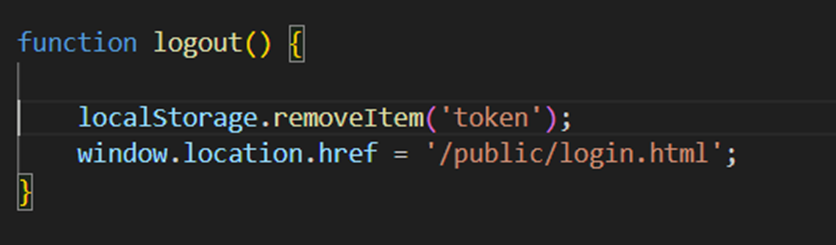
Logout Logic in welkom.js The logout functionality is implemented in the welkom.js script. This script listens for a click event on the logout button and clears any session or local storage data related to the user. Clearing these data ensures that the user's session is properly terminated.
Here’s the code for the logout functionality:
Explanation of the Code:
- Clearing the Authentication Token: The localStorage.removeItem('token') command deletes the token associated with the user session from the browser's localStorage. The token is often used to authenticate API requests or track logged-in sessions. Removing it ensures the user is logged out securely.
- Redirecting to the Login Page: After clearing the token, the user is redirected to the login page using window.location.href = '/login;. This redirects the user to the specified URL, typically the login page, where they can log in again if needed. Welcome message
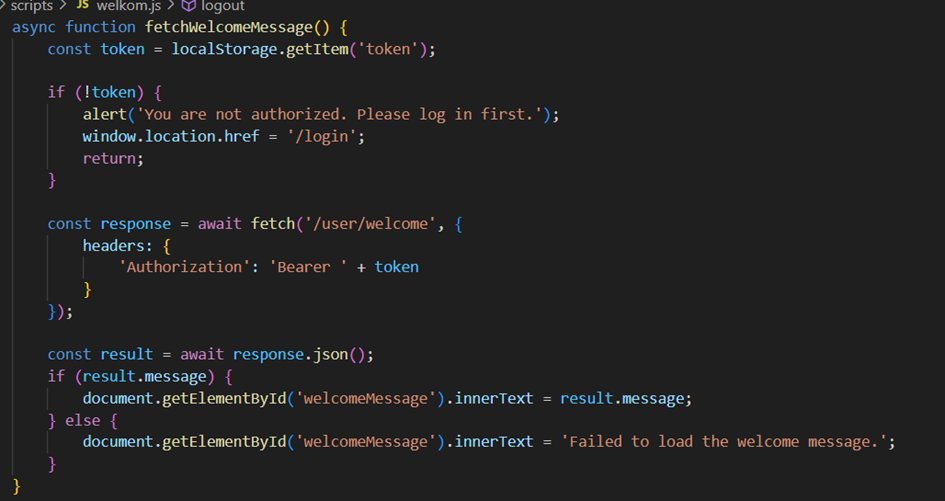
The logic for displaying the welcome message dynamically involves a combination of client-side and server-side code. The client-side script in welkom.js retrieves the user's authentication token, validates it, and fetches the personalized welcome message from the server. The server-side logic in user.js handles the secure delivery of this message based on the authenticated user.
The welkom.js script ensures that only authenticated users can access the page. It retrieves the authentication token stored in the browser and uses it to request the welcome message from the server.
Explanation of the Code:
- Retrieving the Token: The localStorage.getItem('token') retrieves the authentication token that was saved when the user logged in. If no token is found, it alerts the user and redirects them to the login page to ensure only authenticated users proceed.
- Sending the Request: An asynchronous fetch call is made to the server's /user/welcome endpoint. The token is included in the Authorization header in the format Bearer
<token>to validate the user's identity. - Handling the Response: o If the response is successful (response.ok), the server's welcome message is extracted and displayed on the page. o If the response fails, an error message is shown, the invalid token is removed from localStorage, and the user is redirected to the login page.
Server-Side Logic in user.js The user.js module defines the server-side route for delivering the personalized welcome message. It ensures that only authenticated users can access this route by applying a pre-handler for authentication.

Explanation of the Code:
- Authentication Pre-Handler: The route applies fastify.authenticate as a pre-handler. This ensures that the user making the request is authenticated before accessing the route. If the authentication fails, the server denies access.
- Extracting User Information: The request.user object, populated during authentication, contains user details. Here, the username is extracted to personalize the welcome message.
- Sending the Response: A JSON response with a personalized message (Welcome,
<username>!) is sent back to the client. This message is later displayed on the welcome page.
How the Pieces Work Together
- Authentication and Validation: The client script (welkom.js) checks if the user is authorized using the token stored in the browser. The server-side route (/user/welcome) ensures the token is valid before serving the welcome message.
- Personalization: The server dynamically generates a personalized message based on the authenticated user's information (e.g., their username). This message is securely sent to the client.
- Secure Access: Both the client and server enforce security measures: o The client redirects unauthorized users to the login page. o The server verifies tokens to restrict access to the /welcome route. Together, these scripts provide a robust and personalized user experience while maintaining security. Books page
to simulate a database, create a mock array of books in a file called books.js. This file will contain an array of objects, where each object represents a book with the following properties:
- id: A unique identifier for the book.
- title: The title of the book.
- author: The name of the book's author.
- description: A brief description of the book. books.js Example:

Create the Basic EJS File for the books Page
The books page will dynamically display the list of books using the mock data. The page will use an EJS template to iterate over the array of books and display their properties in a structured format.
Create views/books.ejs:
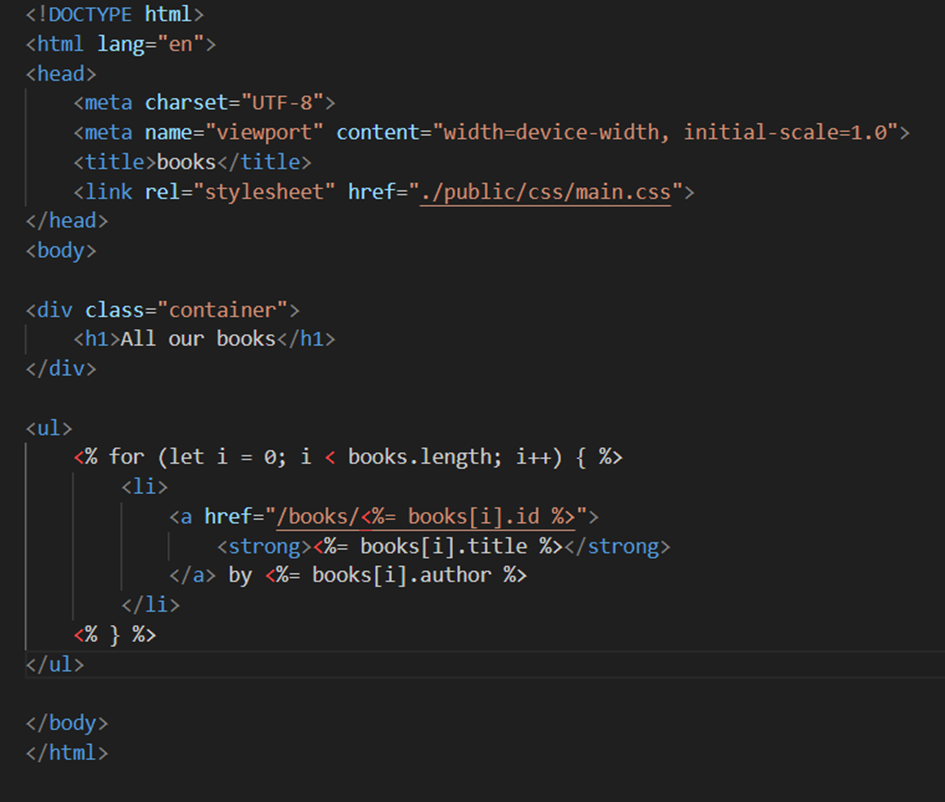
This EJS structure provides the foundation for the books page interface.
key Features:
- The <% for %> loop dynamically generates a list of books based on the data passed from the server.
- <%= %> is used to inject the book data into the HTML, such as the title, author, and description.
Set Up the GET Route for the books Page In your Fastify application, you'll add the books Page route (with the book list). This will be a GET route that will fetch the list of books and pass it to the EJS template. First we require the books data:

The u must add the books route like this:

Detail book page
the bookDetail.ejs file is the page that will display detailed information about a selected book. When a user clicks on a book title in the main list of books, they should be directed to this page where they can see additional information about the book, such as its title, author, description, and possibly other details.
Create the Basic EJS File for the book detail Page
The bookDetail.ejs file will contain the layout and design for the book details page. It will display the title, author, description, and a link to navigate back to the main books list.
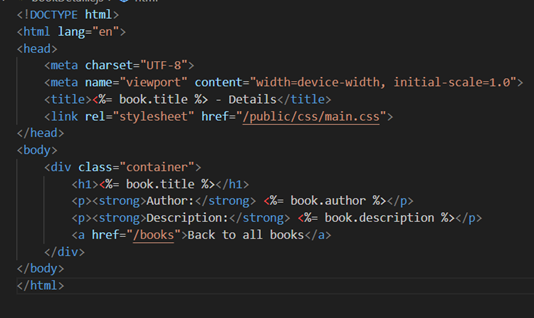
Explanation of the bookDetail.ejs Template:
- Dynamic Data Rendering: o The book title, author, and description are rendered dynamically using <%= book.title %>, <%= book.author %>, and <%= book.description %>. These placeholders will be replaced with actual data when the template is rendered by Fastify.
- Navigation: o There is a link at the bottom of the page (
<a href="/books">Back to All Books</a>) that allows users to easily navigate back to the list of books. This is important for usability and navigation within the application.
Setting Up the GET Route for the Book Detail Page
Next, we need to set up a route in Fastify that will serve this page when a user clicks on a book's title. The route will use the book’s ID from the URL to fetch the correct book from our mock data. The GET route will be defined with a parameter :id that represents the book's unique identifier. When a user navigates to a URL like /books/1, Fastify will capture 1 as the book’s ID and use it to retrieve the book from the data array. Here’s how to set it up in server.js:
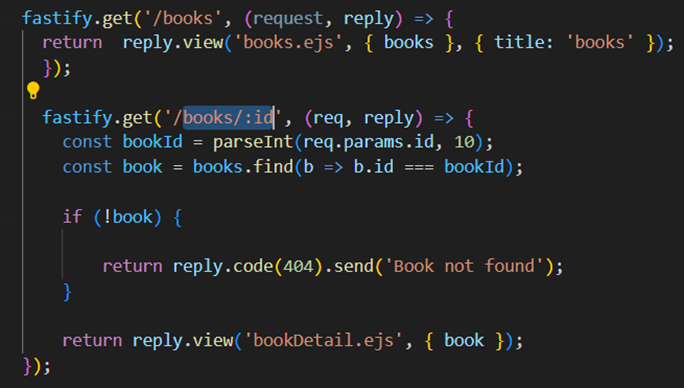
Explanation of the GET Route for /books/🆔
- Route Definition: o The route GET /books/:id is defined using Fastify's get() method. The :id is a URL parameter that represents the unique ID of the book that is being requested.
- Extracting the Book ID: o In the route handler, we extract the id parameter from the URL using req.params.id. This gives us the ID of the book the user clicked on.
- Finding the Book: o The find() method is used to search for the book with the corresponding ID in the books array. If the book is found, it is passed to the bookDetail.ejs template. If not, a 404 error is returned.
- Rendering the Detail Page: o Once the book is found, the reply.view() function renders the bookDetail.ejs file and passes the book data to the template. The dynamic data (book details) is then displayed on the page.
Starting the Fastify Server
Once the routes are set up and the templates are created, you can start your Fastify server to test the application. Here’s how to run the server: Start the Server: Open your terminal and run the following command:

Conclusion: Testing and Next Steps
Congratulations! You've successfully implemented several key features in your Fastify application, including the book list, book detail pages, and user authentication with register and login functionality. Additionally, you've set up a welcome page for authenticated users.
This tutorial covered:
• Setting up Fastify routes to handle both the book list and book detail pages. • Creating EJS templates to dynamically render book data. • Implementing user authentication, including a registration form, login page, and session management. • Creating a welcome page that users are redirected to after logging in. Now that you have the foundation in place, it’s time to test everything to ensure it's working properly. You can: • Test the book list and book detail pages to make sure you can view books and navigate between the list and details. • Check the register and login pages to confirm the authentication flow is functional. • After logging in, ensure the user is redirected to the welcome page with a personalized message. Feel free to modify the code, enhance the design and code,. This is your opportunity to experiment and refine the application. Enjoy testing your app, and good luck with your development!